I had to kick myself into gear to keep up with my Aspiring Metalsmiths team for our most current blog roll. Once spring hits, I am torn between being outside in my garden enjoying all the beauty that surrounds me
or- staying inside and trying to capture at least one of the designs floating around in my head that seem to be inspired by nature and all her changing glory. All my beautiful flowers make me want to create something so I can freeze this beauty in time and metal.
More things to distract me- my granddaughter's birthday is coming up, I must shop. Taxes need to be finished- oh groan, inventory needs done. Being a metalsmith in the spring is just darn tough when you look out your window and see all this beauty!
You may want to read some of my teammies blogs to see just how spring can affect other metalsmiths in different parts of the country - we have some great metalsmiths all with similar issues I'd bet!
Steph Stargell stephstargell.com
Lilian girllovesglitter.blogspot.com
nancycreations nancysjewelrydesigns.blogspot.com
SerpentsDanceDesigns dancetothedoor.blogspot.com
Autumn Bradley autumnbradley.blogspot.com
Contemporary Jewelry by Beatriz Fortes cjbf.blogspot.com
Jessica @ Abella Blue abellabluestudio.com/blog
Sylvia Anderson sylviaanderson.blogspot.com
Gloria gloria-hemlockhollow.blogspot.com
Amy Estelle amyestellemetalworks.blogspot.com/2012/03/spring-has-sprung.html
Esmeralda jewelry-by-silverblueberry.blogspot.se/2012/04/signs-of-spring.html
Mimi and her girls
Mimi and her girls
Tuesday, April 3, 2012
Friday, March 9, 2012
Design Your Own Jewelry!
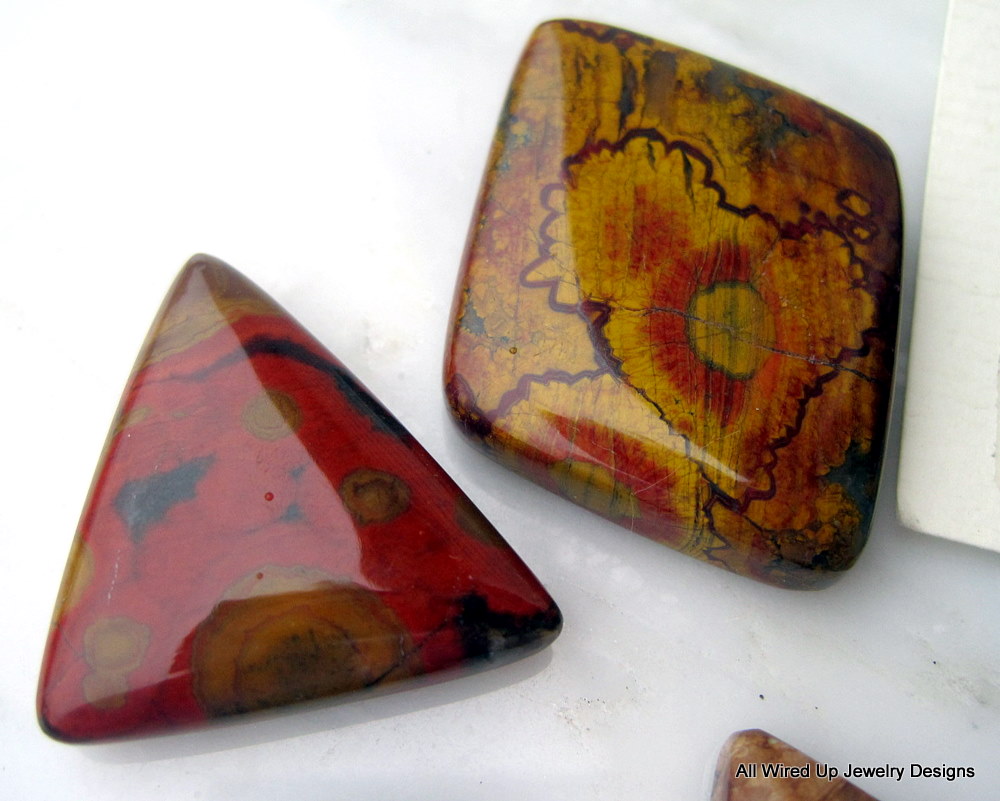
I've finally decided to try and use some of the fabulous cabochon stones I have been collecting for something a customer wants instead of just something I want to do. So many pretty stones, so many design possibilities, but is it what the customer wants? Is it too big, too fancy, not fancy enough, open in the back, closed back- can she wear it with her favorite chain? So many questions to answer when I pick the stone and create a design I love. I know many jewelry artists only want to make what they love and then find the customer that loves their style and designs, me I want customers to have what they want. It's how I shop, I shop for exactly what I want, I try never to just "make do". Jewelry is very personal to most women, it reflects their style and color palette, it says something about them. My first offering is a choice of two beautiful Morgan Hill Poppy Jasper stones that I have had for quite a bit. I actually have a lot of this stone, I love that each stone has wonderful flowers in different shapes, shades of red, yellow, orange, great earth tone colors.
These stones make me happy when I look at them and I guess I'm hoping they will speak to someone else the same way!
I have loads of others to add as I go, but this is an experiment to see if anyone will even find something not labeled as an already made pendant, necklace or bracelet or even if there are customers out there even looking for such a service. I have lots of rings stones too, so maybe that will be my next experiment!
I'd love to hear any comments or even recommendations!
These stones make me happy when I look at them and I guess I'm hoping they will speak to someone else the same way!
I have loads of others to add as I go, but this is an experiment to see if anyone will even find something not labeled as an already made pendant, necklace or bracelet or even if there are customers out there even looking for such a service. I have lots of rings stones too, so maybe that will be my next experiment!
I'd love to hear any comments or even recommendations!
Friday, January 27, 2012
My First Tutorial!! Make A Ring with Gold Fill Wire
Every month my Aspiring Metals Team does what they call, blog roll. I miss a lot because sometimes I just can't think of a darn thing to contribute that I think anyone will find interesting. Well this month, everyone is going to do a tutorial- how to do something- metal, photography for your shop, a technique that someone is good at. I volunteered to do one, then- Oh My, what to do? So, great buddies that they are- they suggested I do a How to Solder and work with gold filled wire. Gold fill is not something everyone likes or enjoys working with but it is pretty, looks like real gold and is a whole lot more affordable than the real McCoy! And no, gold fill does not flake off like gold plated, it does have a core of an alloyed material but there is so much gold pressure bonded, it really does look and act like gold.
How to Make a Ring with 14k Gold Fill Wire
First- start with good material from a reputable supplier. Make sure you are using 14/20 or 14k Gold fill, or at minimum 12/20. Nothing worse than heating something and finding out it's plated as the gold peels off.
Supplies you will need:
Cupronil, Battern's flux or Boric acid and denatured alcohol
Yellow GF solder- there are some better than others, my preference is the paste from Otto Frei or the sheet from Hoover & Strong.
Acid pickle- hot -and possibly super pickle (half pickle and half hydrogen peroxide)
Flex shaft or Dremel- for your wheels- If you don't own a rotary good wet/dry sand paper starting with 100 grit works just fine.
Silicone abrasive wheel- black (this one really cuts through metal so go easy with it)
abrasive wheels- 3M, 80 grit down through pumice
Ring files #2 and #4 cut, other files as needed
polishing compound- my preference is rouge then ZAM
1. Measure and cut your wire to size for your ring. For this ring I used 12 gauge 14/20 GF
2. Bend around mandrel and file ends so they are flush and tight- no light at all in the join area
3. Take your formed ring to your soldering area and coat well with flux on both sides- use a soldering pick or tweezers to flip the ring. If you touch the gold, coat it again. These flux materials protect from fire scale and also reduce the amount of copper alloy that will rise to the surface when GF is heated. The more copper you raise, the more work you have to do to clean and polish after soldering.
4. Heat your ring with a low flame all over to dry the flux, you should see a white coating covering the entire ring. If you have bare spots, more flux is needed. The one in the photo is just right- no shiny spots!
5. For the example above I used Cupronil spray flux- Next I add paste solder and just put it on the seam inside the ring join because I want to pull it through. I heat the ring all over again just to warm it. With gold or gold fill, you only need to heat on either side of the join. Remember, the hotter you get GF the more copper you will raise and the more work you make for yourself for clean up- I am all about less work for cleaning up my own mess. So, heat on medium to hot flame, alternating back and forth on either side of the join so the metal heats evenly. The solder paste will flow through the join and then stop heating immediately.
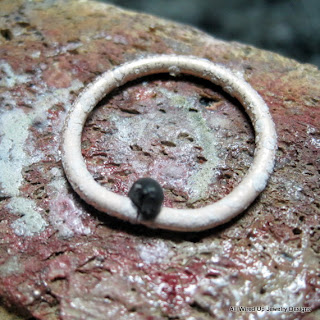
As you can see, I used a bit too much paste, but in my experience too much is a bit better than too little. If you use too little, sometimes you have to flip the piece over, add more solder and heat again. My preference, I'd rather file away excess solder than reheat and have my GF turn orange red from copper. As you can see, this ring is a bit pink, but the flux did it's job and I used just enough heat to flow the solder without getting the ring too hot. The solder is not the exact color of GF so you do have to file. I put this in a pickle bath- no need for super pickle since I was able to control the heat and didn't raise much copper.
After pickle, I brass brush, then hit the files.
I used a #2 cut half round ring file for the inside, followed by a #4 cut half round file, then a black silicone wheel on my flex shaft to remove an scratches left by the file.
6. Now comes clean up. After filing away the solder, I start with a yellow 80 grit 3M wheel, then follow with white 120 grit, red 220 grit, the blue 400 grit
I keep a scrap piece of GF wire close by to compare color- this is after just the first sanding with the yellow wheel and almost all of the pink cast is gone.
The picture above is after 400 grit and you should see that the color match is almost perfect, the brassy yellow of the solder is gone and this ring is now ready for me to hammer and finish down through 1200, pumice and a final polish with rouge and ZAM.
There is never just one way to do anything with metal. This is just how I work with gold fill. I have used this method for rings, bangles and bezels and my results have been fairly consistent. This is just one way, I am sure there are others. Each person that works with metal has their own tips and tricks. I enjoy learning how everyone does things so I have options in my bag when the soldering Gods aren't with me or things just aren't going well in general.
I hope you will also enjoy some of the tutorials from my other teammates and learn a few of their tricks too!
I know I am looking forward to adding the list of blogs below as the other tutorials become ready for prime time. So please come back every few days and learn a trick or two!
Here are the rest of the participating bloggers each with something special they do and hope to share!
VCArtisanOriginals
Sylvia Anderson
Metals Addict
Lilian Ginebra
Esmeralda
Amy Estelle
Stacy
Mary Anne Karren
Shannon of Gifted Designs
Pennee- All Wired Up Jewelry Designs
Jessica @ Abella Blue
Elizabeth Brown - resurrectionsilver.blogspot.com
How to Make a Ring with 14k Gold Fill Wire
First- start with good material from a reputable supplier. Make sure you are using 14/20 or 14k Gold fill, or at minimum 12/20. Nothing worse than heating something and finding out it's plated as the gold peels off.
Supplies you will need:
Cupronil, Battern's flux or Boric acid and denatured alcohol
Yellow GF solder- there are some better than others, my preference is the paste from Otto Frei or the sheet from Hoover & Strong.
Acid pickle- hot -and possibly super pickle (half pickle and half hydrogen peroxide)
Flex shaft or Dremel- for your wheels- If you don't own a rotary good wet/dry sand paper starting with 100 grit works just fine.
Silicone abrasive wheel- black (this one really cuts through metal so go easy with it)
abrasive wheels- 3M, 80 grit down through pumice
Ring files #2 and #4 cut, other files as needed
polishing compound- my preference is rouge then ZAM
1. Measure and cut your wire to size for your ring. For this ring I used 12 gauge 14/20 GF
2. Bend around mandrel and file ends so they are flush and tight- no light at all in the join area
3. Take your formed ring to your soldering area and coat well with flux on both sides- use a soldering pick or tweezers to flip the ring. If you touch the gold, coat it again. These flux materials protect from fire scale and also reduce the amount of copper alloy that will rise to the surface when GF is heated. The more copper you raise, the more work you have to do to clean and polish after soldering.
4. Heat your ring with a low flame all over to dry the flux, you should see a white coating covering the entire ring. If you have bare spots, more flux is needed. The one in the photo is just right- no shiny spots!
5. For the example above I used Cupronil spray flux- Next I add paste solder and just put it on the seam inside the ring join because I want to pull it through. I heat the ring all over again just to warm it. With gold or gold fill, you only need to heat on either side of the join. Remember, the hotter you get GF the more copper you will raise and the more work you make for yourself for clean up- I am all about less work for cleaning up my own mess. So, heat on medium to hot flame, alternating back and forth on either side of the join so the metal heats evenly. The solder paste will flow through the join and then stop heating immediately.
As you can see, I used a bit too much paste, but in my experience too much is a bit better than too little. If you use too little, sometimes you have to flip the piece over, add more solder and heat again. My preference, I'd rather file away excess solder than reheat and have my GF turn orange red from copper. As you can see, this ring is a bit pink, but the flux did it's job and I used just enough heat to flow the solder without getting the ring too hot. The solder is not the exact color of GF so you do have to file. I put this in a pickle bath- no need for super pickle since I was able to control the heat and didn't raise much copper.
After pickle, I brass brush, then hit the files.
I used a #2 cut half round ring file for the inside, followed by a #4 cut half round file, then a black silicone wheel on my flex shaft to remove an scratches left by the file.
6. Now comes clean up. After filing away the solder, I start with a yellow 80 grit 3M wheel, then follow with white 120 grit, red 220 grit, the blue 400 grit
I keep a scrap piece of GF wire close by to compare color- this is after just the first sanding with the yellow wheel and almost all of the pink cast is gone.
The picture above is after 400 grit and you should see that the color match is almost perfect, the brassy yellow of the solder is gone and this ring is now ready for me to hammer and finish down through 1200, pumice and a final polish with rouge and ZAM.
There is never just one way to do anything with metal. This is just how I work with gold fill. I have used this method for rings, bangles and bezels and my results have been fairly consistent. This is just one way, I am sure there are others. Each person that works with metal has their own tips and tricks. I enjoy learning how everyone does things so I have options in my bag when the soldering Gods aren't with me or things just aren't going well in general.
I hope you will also enjoy some of the tutorials from my other teammates and learn a few of their tricks too!
I know I am looking forward to adding the list of blogs below as the other tutorials become ready for prime time. So please come back every few days and learn a trick or two!
Here are the rest of the participating bloggers each with something special they do and hope to share!
VCArtisanOriginals
Sylvia Anderson
Metals Addict
Lilian Ginebra
Esmeralda
Amy Estelle
Stacy
Mary Anne Karren
Shannon of Gifted Designs
Pennee- All Wired Up Jewelry Designs
Jessica @ Abella Blue
Elizabeth Brown - resurrectionsilver.blogspot.com
Friday, December 23, 2011
Happy Holidays !!!!!
I wanted to be sure to say a huge thank you to all my customers and friends for a super holiday season and to say Happy Holidays, Merry Christmas, Happy Hanukkah and Happy Kwanza. Whatever or however you celebrate the season be safe, enjoy friends and family and take time to relax and enjoy.
My shop http://www.etsy.com/shop/PPennee is still showing goodies for sale, but I am officially on vacation for a few days until December 26th. I had such a lovely holiday season, with wonderful understanding customers and packages that all seemed to arrive at their proper destination. (Heaves a big sigh of relief over that). I made a few new things just for the holidays and did some custom items I thought turned out just great. Check out the gold stack ring set- ordered by an engaged couple for his mom and her future mother-in-law
I also had a special request to do a spoon ring- of all things it seems these are very popular still
But best of all, I got an early Christmas present, my new granddaughter Alexandra Rose born on December 8. Ally is very happy to be loved by many but is especially enthralled with her big sister Olivia who sings to her and tells her stories.
I am looking forward to a full week of time spent with my family (off from the full time job too!!!!) and getting back to the bench after the holidays.
Wishing you all a fantastic holiday!
My shop http://www.etsy.com/shop/PPennee is still showing goodies for sale, but I am officially on vacation for a few days until December 26th. I had such a lovely holiday season, with wonderful understanding customers and packages that all seemed to arrive at their proper destination. (Heaves a big sigh of relief over that). I made a few new things just for the holidays and did some custom items I thought turned out just great. Check out the gold stack ring set- ordered by an engaged couple for his mom and her future mother-in-law
I also had a special request to do a spoon ring- of all things it seems these are very popular still
But best of all, I got an early Christmas present, my new granddaughter Alexandra Rose born on December 8. Ally is very happy to be loved by many but is especially enthralled with her big sister Olivia who sings to her and tells her stories.
I am looking forward to a full week of time spent with my family (off from the full time job too!!!!) and getting back to the bench after the holidays.
Wishing you all a fantastic holiday!
Tuesday, November 1, 2011
I Have A Winner!!!
I am excited to announce the winner of my very first blog give away! Congratulations to Lauren S who is the winner of my sterling floral pattern bangle. Lauren's name was chosen from using a random drawing program on random.org. I have made this drawing entrant accessible so anyone who entered can verify their participation but not see the names of the other entrants. Any entrant can go to http://www.random.org/draws/details/?draw=8009 and check to make sure I didn't miss their entry. I had a total of 60 entries!!!
I have e-mailed Lauren this morning to notify her . Lauren has 3 days to get back to me to accept her prize. If I don't hear from her, the second name from the drawing will be posted here on my blog and on my facebook business page https://www.facebook.com/AllWiredUpJewelryDesigns
I appreciate all who took time to enter my give away and to visit my new website http://www.allwiredupjewelrydesigns.com/ . I do hope some or all of you will come back to shop or visit to see new items as I add them. Gift giving season is upon us - it always gets here so fast!!!!
Thank you all for participating!!
I have e-mailed Lauren this morning to notify her . Lauren has 3 days to get back to me to accept her prize. If I don't hear from her, the second name from the drawing will be posted here on my blog and on my facebook business page https://www.facebook.com/AllWiredUpJewelryDesigns
I appreciate all who took time to enter my give away and to visit my new website http://www.allwiredupjewelrydesigns.com/ . I do hope some or all of you will come back to shop or visit to see new items as I add them. Gift giving season is upon us - it always gets here so fast!!!!
Thank you all for participating!!
Saturday, October 8, 2011
My Very First Blog Give Away
I know, I know- I am really bad about chatting here on my blog. I am promising myself to do better after my daughter presents me with my new grand baby in December. In the meantime, I'm still working full time, trying to create new jewelry and just keep up with the daily grind. But- I have finally got my website http://www.allwiredupjewelrydesigns.com looking pretty much the way I want. Now all I need is for people to find me on a regular basis. So I'm going to do a give away- a lovely piece of jewelry made by me just for you, the WINNER!
First and foremost - what you will win is one of my favorite and most popular bangles the Floral Pattern Bangle. I will make this in your size and shape in round or oval, your choice and finish in shiny as shown or oxidized to bring out the detail of this lovely pattern. I am choosing this bangle because the company I purchase the wire from has discontinued it- there won't be any more of these made when my supply is gone. This makes this just a little more special because no one anywhere can make one like it!
If you'd like to read the details about the bangles and see the options you can take a look on my site by clicking this link: http://shop.allwiredupjewelrydesigns.com/Sterling-Floral-Pattern-Bangle-95.htm
Since my blog isn't updated as often as I'd like, I will be posting my giveaway on Facebook and Tweeting about it also. Giveaway starts today, Oct 8 and ends at midnight Halloween - Oct 31. I will draw the winner on November 1 and announce the winner here on my blog!
How To Enter The Giveaway
Giveaway is open worldwide to entrants at least 18 years old. I will be pulling a number from my random.org top hat after 11:59pm EST on November 1, 2011, and the corresponding commenter will win! Pennee will contact that lucky soul for a mailing address. If she doesn't hear back from the winner within 3 days, a new number will be drawn.
Mandatory Entry: Gaze around All Wired Up Jewelry Designs website shop then comment on this post with your favorite handmade item and a way to contact you, preferably an email or facebook user name. If e-mail is used, this is a secure site and no e-mail addresses are shared or otherwise used. Random.org deletes all e-mail addresses entered at the completion of the drawing.
Extra Entries: Don't forget the mandatory comment before moving on to these! Please leave a separate comment for each extra entry to count.
1. Like that same item on your facebook page and include the link when commenting. Don't forget to use @allwiredupjewelrydesigns so I can see!!!!
2. Buy anything from my All Wired Up Jewelry Designs Website! Use coupon code NewSite15 at checkout to receive 15% off your order $20 and over (before coupon). Make sure to comment on my blog for anything you purchase, every $20 you spend is an extra entry! Please leave me message when you check out!
3. Like this giveaway on facebook by using the like button on the right side bar of this post OR share it on your facebook page and comment with the link.
4. Like All Wired Up Jewelry Designs page on facebook for one extra entry.
5. Follow Ppenne on twitter. 1 entry
6. Tweet ONCE about the giveaway using the one below or a variation of your own. Leave a comment with the link.
Enter @all wired up jewelry designs #handmade #Halloween #giveaway to #win Floral Pattern Bangle
7. Spread the word! Pin this giveaway to Pinterest. Click to share this giveaway on Stumble Upon, Technorati, Digg, or Del.icio.us. I'll honor one entry for every networking website you share it on, just make sure to leave separate comments for each.
8. Follow my blog!!!!
Please don't forget- I need a comment for each thing you do and an e-mail address or username so I can put you in random.org for this drawing!!!!
I am very excited about doing this give away. If for some reason you are not a bangle wearer and you win- we can certainly work out something so you get something you love for the same value!!!!!
Can't wait to see who wins!!
First and foremost - what you will win is one of my favorite and most popular bangles the Floral Pattern Bangle. I will make this in your size and shape in round or oval, your choice and finish in shiny as shown or oxidized to bring out the detail of this lovely pattern. I am choosing this bangle because the company I purchase the wire from has discontinued it- there won't be any more of these made when my supply is gone. This makes this just a little more special because no one anywhere can make one like it!
If you'd like to read the details about the bangles and see the options you can take a look on my site by clicking this link: http://shop.allwiredupjewelrydesigns.com/Sterling-Floral-Pattern-Bangle-95.htm
Since my blog isn't updated as often as I'd like, I will be posting my giveaway on Facebook and Tweeting about it also. Giveaway starts today, Oct 8 and ends at midnight Halloween - Oct 31. I will draw the winner on November 1 and announce the winner here on my blog!
How To Enter The Giveaway
Giveaway is open worldwide to entrants at least 18 years old. I will be pulling a number from my random.org top hat after 11:59pm EST on November 1, 2011, and the corresponding commenter will win! Pennee will contact that lucky soul for a mailing address. If she doesn't hear back from the winner within 3 days, a new number will be drawn.
Mandatory Entry: Gaze around All Wired Up Jewelry Designs website shop then comment on this post with your favorite handmade item and a way to contact you, preferably an email or facebook user name. If e-mail is used, this is a secure site and no e-mail addresses are shared or otherwise used. Random.org deletes all e-mail addresses entered at the completion of the drawing.
Extra Entries: Don't forget the mandatory comment before moving on to these! Please leave a separate comment for each extra entry to count.
1. Like that same item on your facebook page and include the link when commenting. Don't forget to use @allwiredupjewelrydesigns so I can see!!!!
2. Buy anything from my All Wired Up Jewelry Designs Website! Use coupon code NewSite15 at checkout to receive 15% off your order $20 and over (before coupon). Make sure to comment on my blog for anything you purchase, every $20 you spend is an extra entry! Please leave me message when you check out!
3. Like this giveaway on facebook by using the like button on the right side bar of this post OR share it on your facebook page and comment with the link.
4. Like All Wired Up Jewelry Designs page on facebook for one extra entry.
5. Follow Ppenne on twitter. 1 entry
6. Tweet ONCE about the giveaway using the one below or a variation of your own. Leave a comment with the link.
Enter @all wired up jewelry designs #handmade #Halloween #giveaway to #win Floral Pattern Bangle
7. Spread the word! Pin this giveaway to Pinterest. Click to share this giveaway on Stumble Upon, Technorati, Digg, or Del.icio.us. I'll honor one entry for every networking website you share it on, just make sure to leave separate comments for each.
8. Follow my blog!!!!
Please don't forget- I need a comment for each thing you do and an e-mail address or username so I can put you in random.org for this drawing!!!!
I am very excited about doing this give away. If for some reason you are not a bangle wearer and you win- we can certainly work out something so you get something you love for the same value!!!!!
Can't wait to see who wins!!
Monday, July 25, 2011
What I'm Working On
Here it is almost another month and with all the crazy things that happen in life, no time to blog! My Aspiring Metals Team makes me get off my duff periodically with Project Blogroll which is the teams way of saying- write something about what's going on in your shop! This month we have an exciting bunch of posts (links below) of what some of my aspiring teammates are up to in their shops - what are they working on!!! Loads of fun things- please browse through and see some amazing art and the steps it takes to get a finished piece of fine jewelry.
Hopefully, many of the items I am working on will be found in my shop http://www.etsy.com/shop/PPennee very soon! At least that's my hope.
My big news this month is that I finally bought a kiln so I could do more work in Precious Metal Clay - having the kiln should make my life a lot easier and I should get a much more consistent product. In order to create with metal clay, many people use templates, stamps, texture plates. Some sculpt and hand carve every piece. I love making molds with Sculpty Clay. I see a cool leaf, a sea shell or even a twig, I mold it- never know when it might come in handy . I also love to use leftover clay from filing and just dry pieces that inevitably appear. I make a slip with the dry particles and then coat real leaves from my garden which I will then fire to create jewelry. Below are some of my molds and also a picture of some leaves in the process of being coated with slip. It always amazes me that when fired, you can see every single vein in a leaf!
The hen scratched mold at the top is my own hand creation of a cherry blossom branch, to the right is part of a nautilus shell, a coleus leaf and a ginkho leaf. All will eventually be pendants or earrings, some set with stones, some just pretty silver!
Love the leaves- learned a trick on my Metal Clay Heads team that it you tape the leaf to something when you start coating it with the silver slip- it won't curl up on you and crack! Cracked silver is not a good thing at all! The top two heart shaped leaves are from a redbud tree from this spring, the small one and much longer one are from a verbena plant and the last one is from a tree I walked by and liked the leaf- not quite sure what it is!
I also have a series of pendants that have been on the bench way too long waiting for me to have a day to decide how I want to finish each one and put the finishing touches on. The series will all have a different textured back plate to complement the stone and or the design of the final project. For starters I chose a pear shaped labradorite decorated with trim that I think makes it look like a birds tail feathers. So my plan is to oxidize the back plate, the dangle some oxidized chains from a hole I will drill in the bottom center feather then add some tiny moonstone, labradorite and aquamarine briolettes to make a really interesting pendant. The ocean jasper with it's great little orbs of color will have a pretty gemstone on the bail I create for it and the oval labradorite still hasn't told me what it wants to be!
I always enjoy making rings and I'm am way low on labradorite rings in my shop so here's a few in process.
I always seem to be doing something with flush set (aka gypsy set) gemstones lately. Since I've learned how to do it, I feel like I need to keep doing it so I don't forget how! Silly I know, but practice makes perfect. Below is a heavy band ring with a custom order for a 2mm center hot pink sapphire with two 2mm black diamonds on either side. This combo would not have been my choice, but the buyer was adamant that she had to have it exactly like this so who am I to argue! Just waiting for my little diamonds to arrive!
I hope you've enjoyed seeing a little piece of what's on my bench- there's always something in some stage or another of being created and I love being able to walk to the bench and say- who wants to be finished today? He who squeaks me, me me- gets picked!
I hope you will take some time and read some of the other blogs posted below. You'll see some amazing projects and beautiful artwork from my Aspiring Metals Team!
Hopefully, many of the items I am working on will be found in my shop http://www.etsy.com/shop/PPennee very soon! At least that's my hope.
My big news this month is that I finally bought a kiln so I could do more work in Precious Metal Clay - having the kiln should make my life a lot easier and I should get a much more consistent product. In order to create with metal clay, many people use templates, stamps, texture plates. Some sculpt and hand carve every piece. I love making molds with Sculpty Clay. I see a cool leaf, a sea shell or even a twig, I mold it- never know when it might come in handy . I also love to use leftover clay from filing and just dry pieces that inevitably appear. I make a slip with the dry particles and then coat real leaves from my garden which I will then fire to create jewelry. Below are some of my molds and also a picture of some leaves in the process of being coated with slip. It always amazes me that when fired, you can see every single vein in a leaf!
The hen scratched mold at the top is my own hand creation of a cherry blossom branch, to the right is part of a nautilus shell, a coleus leaf and a ginkho leaf. All will eventually be pendants or earrings, some set with stones, some just pretty silver!
Love the leaves- learned a trick on my Metal Clay Heads team that it you tape the leaf to something when you start coating it with the silver slip- it won't curl up on you and crack! Cracked silver is not a good thing at all! The top two heart shaped leaves are from a redbud tree from this spring, the small one and much longer one are from a verbena plant and the last one is from a tree I walked by and liked the leaf- not quite sure what it is!
I also have a series of pendants that have been on the bench way too long waiting for me to have a day to decide how I want to finish each one and put the finishing touches on. The series will all have a different textured back plate to complement the stone and or the design of the final project. For starters I chose a pear shaped labradorite decorated with trim that I think makes it look like a birds tail feathers. So my plan is to oxidize the back plate, the dangle some oxidized chains from a hole I will drill in the bottom center feather then add some tiny moonstone, labradorite and aquamarine briolettes to make a really interesting pendant. The ocean jasper with it's great little orbs of color will have a pretty gemstone on the bail I create for it and the oval labradorite still hasn't told me what it wants to be!
I always enjoy making rings and I'm am way low on labradorite rings in my shop so here's a few in process.
I always seem to be doing something with flush set (aka gypsy set) gemstones lately. Since I've learned how to do it, I feel like I need to keep doing it so I don't forget how! Silly I know, but practice makes perfect. Below is a heavy band ring with a custom order for a 2mm center hot pink sapphire with two 2mm black diamonds on either side. This combo would not have been my choice, but the buyer was adamant that she had to have it exactly like this so who am I to argue! Just waiting for my little diamonds to arrive!
I hope you've enjoyed seeing a little piece of what's on my bench- there's always something in some stage or another of being created and I love being able to walk to the bench and say- who wants to be finished today? He who squeaks me, me me- gets picked!
I hope you will take some time and read some of the other blogs posted below. You'll see some amazing projects and beautiful artwork from my Aspiring Metals Team!
- Esmeralda http://jewelry-by-silverblueberry.blogspot.com/
- Happy Tortoise Designs http://www.happytortoisedesigns.blogspot.com/
- Crow Steals Fire http://crowstealsfire.blogspot.com/
- Contemporary Jewelry by Beatriz Fortes http://cjbf.blogspot.com/
- steph http://stephstargell.com
- Jessica @ Abella Blue http://www.abellablue.com/blog
- Pennee- All Wired Up Jewelry Designs http://www.allwiredupjewelrydesigns.blogspot.com/
- Sylvia Anderson http://www.sylviaanderson.blogspot.com/
- Stacy http://www.formandfunktionaccessories.blogspot.com/
- Mary Anne Karren http://silverpearlmetalworks.wordpress.com/
- Brightstar109 www.brightstar109.blogspot.com
- Amy Nicole Artisan Jewelry Http://Rubymtnbeads.blogspot.com
- Resurrection Silver http://www.resurrectionsilver.blogspot.com
- Kwant Essentials http://kwantessentials.blogspot.com/2011/07/show-and-tell-from-start-to-finish.html
- Kit and Caboodle Shop http://thisartistsjourney.blogspot.com
- Julie http://jamauerer.blogspot.com
- Lilian http://www.girllovesglitter.blogspot.com/
- Autumn Bradley Jewelry Design http://www.autumnbradley.blogspot.com
Subscribe to:
Posts (Atom)