I had no idea they had summer camp for adults! No clue that there were wonderful things that adults could sign up for for a week or even a full 2 weeks. You could be a "day camper" or you could make it "away camp" and stay in the dorms and be a full time camper taking as many classes as you can fit into the day!
Common Ground on the Hill is just such a camp, right in my own back yard, which happens annually at McDaniel College. I know this isn't the only place that has these wonderful camps, I met loads of people who had been elsewhere or were going somewhere to do more summer camp!
The most wonderful thing about this camp is it is totally dedicated to art and artists of all kinds. From making native black clay into beautiful works of pottery art, making a gourd banjo, taking women's blues singing lessons and yes- metalwork classes! Click on the link above to see the myriad of classes available for all ages! Yes, there were 70 year old women taking beginning blacksmithing classes and there were high school students with scholarships taking piano for the first time. So much fun and so many wonderful new friends I met!
Of course I took a jewelry class! I have always wanted to take a class from Linda Van Hart of Tollhouse Studio. Linda is the director of the arts program for Common Ground and is also a full time professor of art at McDaniel, has a fabulous art studio and does shows all over the US. Her forte is chasing and repousse, but she is so gifted a teacher, she is able to teach all forms of metalwork to a class that includes rank beginners to those with experience and makes it fun, challenging and exciting for everyone.
This years class was Reticulation, along with demos for chasing and repousse, wire work and forging. Reticulation is the process of taking a piece of silver a bit different from sterling (sterling is .925, so only about 17% copper - reticulation silver is 20% copper), heating and coolong it many times, and rising the pure silver, then painting your design with a hot torch to make beautiful hills and valleys of swirled silver on the surface. No two pieces are ever alike.
This was my main project - a hydragea leaf from my garden, cut to shape then reticulated. Later I added the stem and created a neck wire to form the torque.
The process of reticulation was 7 steps, usually mine take
10-12. She had us heat (no flux), air cool (I used to quench), pickle,
scrub with a brass brush then scrub with pumice powder using the 3M
sanding pads- fine grit. Do that 6 times- on the 7th time after pickle-
no brass or pumice- just reticulate. Everyone in class got a perfect
result first time- even total beginners that had never touched a torch.
So the leaf shrug, and earrings were from reticulation silver- the cuff
was from 18g sterling. I had to use a torch in each hand to keep it hot
enough to reticulate, then she helped me holding one torch while I added
my trash and treasure to fuse the sterling and gold. No solder
anywhere.
After trying the process with reticulation silver, I wanted to see what effect and pattern I could get with sterling. Sterling is a bit less expensive (not much) and I have more of that- I had to order the reticulation silver for the class. I also wanted to try fusing sterling and gold to sterling- no soldering. The result is my Treasure Trash Cuff with bits and pieces of scrap sterling, some granulation balls I made with scrap in sterling and a few 14k gold balls also made from scrap.
With my left over scrap from my leaf, I was able to get 2 pair of earrings. The little circles were cut with a disk cutter, the aspen leaves were sawed from a traced aspen leaf from my neighbors tree!
I hope you enjoyed my little story about adult summer camp- and I really hope you will look into these wonderful programs for yourself or your kids to expand and grow their love of the arts!
Mimi and her girls
Mimi and her girls
Sunday, July 15, 2012
Sunday, June 10, 2012
My First Outside Show Experience
I suppose many sellers, of anything hand crafted, would be really upset to spend weeks and weeks getting ready for a show, to get there, and sell not one single thing. Maybe I should be, but I'm not. I had mostly a very nice time at the show, finally got to meet some of my local BEST ( Baltimore Etsy Street Team) members and I did have loads of complements on my jewelry from festival goers.
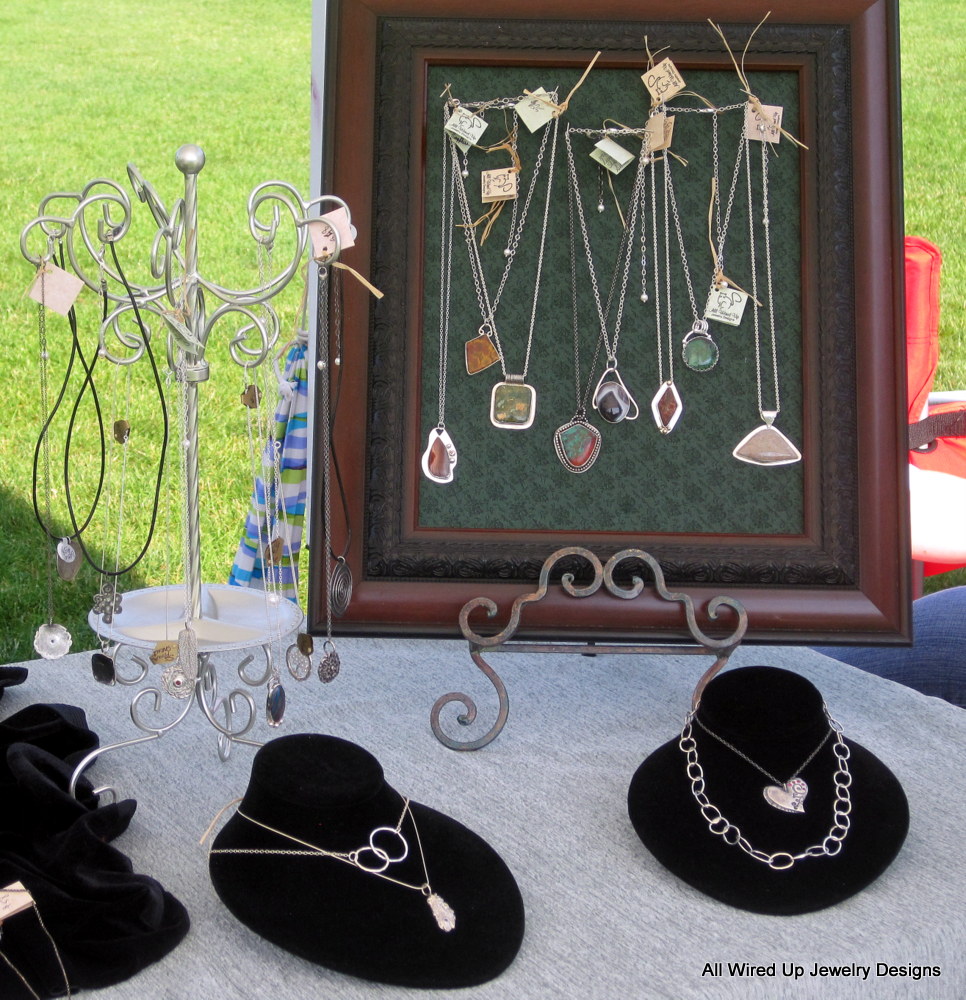
So here's my booth, then I'll tell you a bit of the story, some of it should give you a chuckle.
That's my teammate Abby working away behind my booth. I shared with Abby, who makes beautiful purses, and Kelly who makes these great kitchy anime polymer clay charms and necklaces that are so colorful and bright!
So the funny part first. The show was in historic Gettysburg, PA. If you've never visited, it really should go on your bucket list. Great town and the historic battlefield tours and reinactments are wonderful for families to enjoy and learn about our history. I only live 45 minutes away if there is heavy traffic, but I decided to get a room so I could be up and ready to set up for the first time ever. At 3 AM I awoke on Saturday and I had left all my money at home- no change, no cash sales. Up at 5 and down the road I went. Got money, got back to Gettysburg at 6:45 AM. Yes, I drove fast, but not too fast. So funny, I never needed a dime!
I never did have a chance to set up ahead of time for a trial run, but the experience of setting up was made far easier by teammates to give advice on how to keep things from blowing over and arranging things so they would actually get seen. I had help from my aspiring metals teammate Amy on how to display my stone pendants and I really liked the frame and stand I found to show them off! Earrings, rings, bangles and cuffs sort of took care of themselves!
The sad part of the day was the Arts Festival had moved from a busy touristy downtown location with 4000 visitors last year to a lovely spacious college campus grounds this year- with no signage anywhere in town to let anyone know we were even there! So, very few visitors, good bands played all day. My booth mates were chatty and friendly and our neighboring BEST teammates visited and chatted as well. It did get hotter than Hades at the end of the afternoon, which being a northerner, is never good on my sunny disposition.
I came home very tired, a little disappointed I didn't sell anything, but very happy to have had the experience so I know what to expect when I can find a nice air conditioned indoor show to attend!
So here's my booth, then I'll tell you a bit of the story, some of it should give you a chuckle.
That's my teammate Abby working away behind my booth. I shared with Abby, who makes beautiful purses, and Kelly who makes these great kitchy anime polymer clay charms and necklaces that are so colorful and bright!
So the funny part first. The show was in historic Gettysburg, PA. If you've never visited, it really should go on your bucket list. Great town and the historic battlefield tours and reinactments are wonderful for families to enjoy and learn about our history. I only live 45 minutes away if there is heavy traffic, but I decided to get a room so I could be up and ready to set up for the first time ever. At 3 AM I awoke on Saturday and I had left all my money at home- no change, no cash sales. Up at 5 and down the road I went. Got money, got back to Gettysburg at 6:45 AM. Yes, I drove fast, but not too fast. So funny, I never needed a dime!
I never did have a chance to set up ahead of time for a trial run, but the experience of setting up was made far easier by teammates to give advice on how to keep things from blowing over and arranging things so they would actually get seen. I had help from my aspiring metals teammate Amy on how to display my stone pendants and I really liked the frame and stand I found to show them off! Earrings, rings, bangles and cuffs sort of took care of themselves!
The sad part of the day was the Arts Festival had moved from a busy touristy downtown location with 4000 visitors last year to a lovely spacious college campus grounds this year- with no signage anywhere in town to let anyone know we were even there! So, very few visitors, good bands played all day. My booth mates were chatty and friendly and our neighboring BEST teammates visited and chatted as well. It did get hotter than Hades at the end of the afternoon, which being a northerner, is never good on my sunny disposition.
I came home very tired, a little disappointed I didn't sell anything, but very happy to have had the experience so I know what to expect when I can find a nice air conditioned indoor show to attend!
Tuesday, April 3, 2012
Spring Has Sprung
I had to kick myself into gear to keep up with my Aspiring Metalsmiths team for our most current blog roll. Once spring hits, I am torn between being outside in my garden enjoying all the beauty that surrounds me
or- staying inside and trying to capture at least one of the designs floating around in my head that seem to be inspired by nature and all her changing glory. All my beautiful flowers make me want to create something so I can freeze this beauty in time and metal.
More things to distract me- my granddaughter's birthday is coming up, I must shop. Taxes need to be finished- oh groan, inventory needs done. Being a metalsmith in the spring is just darn tough when you look out your window and see all this beauty!
You may want to read some of my teammies blogs to see just how spring can affect other metalsmiths in different parts of the country - we have some great metalsmiths all with similar issues I'd bet!
Steph Stargell stephstargell.com
Lilian girllovesglitter.blogspot.com
nancycreations nancysjewelrydesigns.blogspot.com
SerpentsDanceDesigns dancetothedoor.blogspot.com
Autumn Bradley autumnbradley.blogspot.com
Contemporary Jewelry by Beatriz Fortes cjbf.blogspot.com
Jessica @ Abella Blue abellabluestudio.com/blog
Sylvia Anderson sylviaanderson.blogspot.com
Gloria gloria-hemlockhollow.blogspot.com
Amy Estelle amyestellemetalworks.blogspot.com/2012/03/spring-has-sprung.html
Esmeralda jewelry-by-silverblueberry.blogspot.se/2012/04/signs-of-spring.html
or- staying inside and trying to capture at least one of the designs floating around in my head that seem to be inspired by nature and all her changing glory. All my beautiful flowers make me want to create something so I can freeze this beauty in time and metal.
More things to distract me- my granddaughter's birthday is coming up, I must shop. Taxes need to be finished- oh groan, inventory needs done. Being a metalsmith in the spring is just darn tough when you look out your window and see all this beauty!
You may want to read some of my teammies blogs to see just how spring can affect other metalsmiths in different parts of the country - we have some great metalsmiths all with similar issues I'd bet!
Steph Stargell stephstargell.com
Lilian girllovesglitter.blogspot.com
nancycreations nancysjewelrydesigns.blogspot.com
SerpentsDanceDesigns dancetothedoor.blogspot.com
Autumn Bradley autumnbradley.blogspot.com
Contemporary Jewelry by Beatriz Fortes cjbf.blogspot.com
Jessica @ Abella Blue abellabluestudio.com/blog
Sylvia Anderson sylviaanderson.blogspot.com
Gloria gloria-hemlockhollow.blogspot.com
Amy Estelle amyestellemetalworks.blogspot.com/2012/03/spring-has-sprung.html
Esmeralda jewelry-by-silverblueberry.blogspot.se/2012/04/signs-of-spring.html
Friday, March 9, 2012
Design Your Own Jewelry!
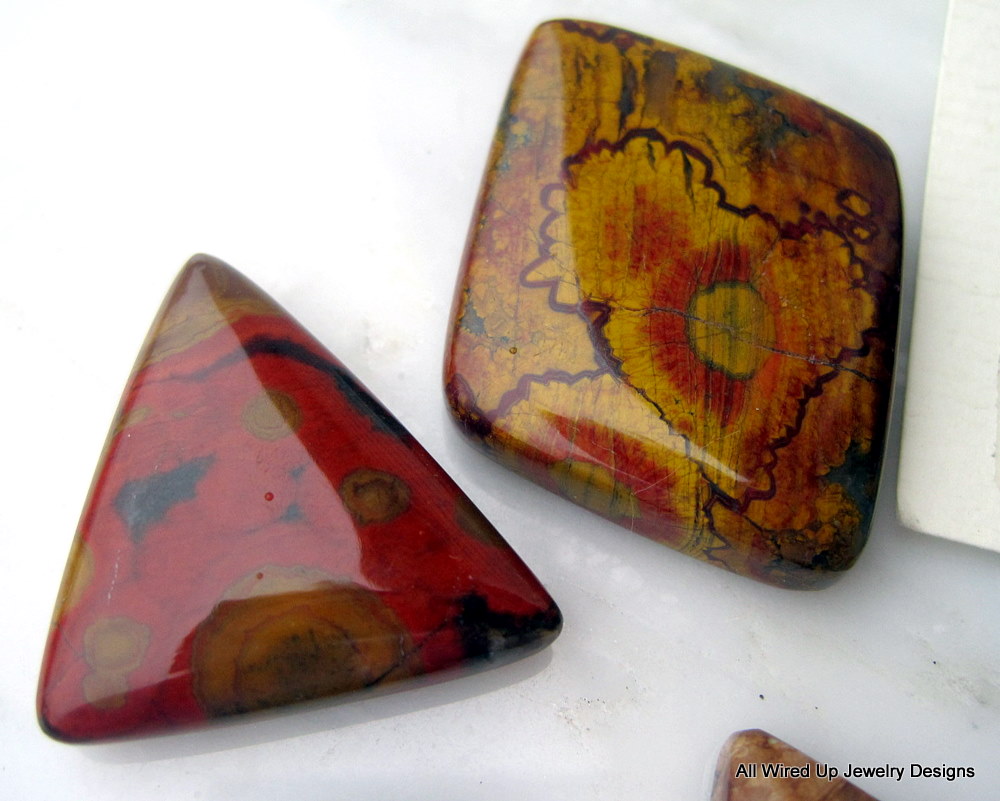
I've finally decided to try and use some of the fabulous cabochon stones I have been collecting for something a customer wants instead of just something I want to do. So many pretty stones, so many design possibilities, but is it what the customer wants? Is it too big, too fancy, not fancy enough, open in the back, closed back- can she wear it with her favorite chain? So many questions to answer when I pick the stone and create a design I love. I know many jewelry artists only want to make what they love and then find the customer that loves their style and designs, me I want customers to have what they want. It's how I shop, I shop for exactly what I want, I try never to just "make do". Jewelry is very personal to most women, it reflects their style and color palette, it says something about them. My first offering is a choice of two beautiful Morgan Hill Poppy Jasper stones that I have had for quite a bit. I actually have a lot of this stone, I love that each stone has wonderful flowers in different shapes, shades of red, yellow, orange, great earth tone colors.
These stones make me happy when I look at them and I guess I'm hoping they will speak to someone else the same way!
I have loads of others to add as I go, but this is an experiment to see if anyone will even find something not labeled as an already made pendant, necklace or bracelet or even if there are customers out there even looking for such a service. I have lots of rings stones too, so maybe that will be my next experiment!
I'd love to hear any comments or even recommendations!
These stones make me happy when I look at them and I guess I'm hoping they will speak to someone else the same way!
I have loads of others to add as I go, but this is an experiment to see if anyone will even find something not labeled as an already made pendant, necklace or bracelet or even if there are customers out there even looking for such a service. I have lots of rings stones too, so maybe that will be my next experiment!
I'd love to hear any comments or even recommendations!
Friday, January 27, 2012
My First Tutorial!! Make A Ring with Gold Fill Wire
Every month my Aspiring Metals Team does what they call, blog roll. I miss a lot because sometimes I just can't think of a darn thing to contribute that I think anyone will find interesting. Well this month, everyone is going to do a tutorial- how to do something- metal, photography for your shop, a technique that someone is good at. I volunteered to do one, then- Oh My, what to do? So, great buddies that they are- they suggested I do a How to Solder and work with gold filled wire. Gold fill is not something everyone likes or enjoys working with but it is pretty, looks like real gold and is a whole lot more affordable than the real McCoy! And no, gold fill does not flake off like gold plated, it does have a core of an alloyed material but there is so much gold pressure bonded, it really does look and act like gold.
How to Make a Ring with 14k Gold Fill Wire
First- start with good material from a reputable supplier. Make sure you are using 14/20 or 14k Gold fill, or at minimum 12/20. Nothing worse than heating something and finding out it's plated as the gold peels off.
Supplies you will need:
Cupronil, Battern's flux or Boric acid and denatured alcohol
Yellow GF solder- there are some better than others, my preference is the paste from Otto Frei or the sheet from Hoover & Strong.
Acid pickle- hot -and possibly super pickle (half pickle and half hydrogen peroxide)
Flex shaft or Dremel- for your wheels- If you don't own a rotary good wet/dry sand paper starting with 100 grit works just fine.
Silicone abrasive wheel- black (this one really cuts through metal so go easy with it)
abrasive wheels- 3M, 80 grit down through pumice
Ring files #2 and #4 cut, other files as needed
polishing compound- my preference is rouge then ZAM
1. Measure and cut your wire to size for your ring. For this ring I used 12 gauge 14/20 GF
2. Bend around mandrel and file ends so they are flush and tight- no light at all in the join area
3. Take your formed ring to your soldering area and coat well with flux on both sides- use a soldering pick or tweezers to flip the ring. If you touch the gold, coat it again. These flux materials protect from fire scale and also reduce the amount of copper alloy that will rise to the surface when GF is heated. The more copper you raise, the more work you have to do to clean and polish after soldering.
4. Heat your ring with a low flame all over to dry the flux, you should see a white coating covering the entire ring. If you have bare spots, more flux is needed. The one in the photo is just right- no shiny spots!
5. For the example above I used Cupronil spray flux- Next I add paste solder and just put it on the seam inside the ring join because I want to pull it through. I heat the ring all over again just to warm it. With gold or gold fill, you only need to heat on either side of the join. Remember, the hotter you get GF the more copper you will raise and the more work you make for yourself for clean up- I am all about less work for cleaning up my own mess. So, heat on medium to hot flame, alternating back and forth on either side of the join so the metal heats evenly. The solder paste will flow through the join and then stop heating immediately.
As you can see, I used a bit too much paste, but in my experience too much is a bit better than too little. If you use too little, sometimes you have to flip the piece over, add more solder and heat again. My preference, I'd rather file away excess solder than reheat and have my GF turn orange red from copper. As you can see, this ring is a bit pink, but the flux did it's job and I used just enough heat to flow the solder without getting the ring too hot. The solder is not the exact color of GF so you do have to file. I put this in a pickle bath- no need for super pickle since I was able to control the heat and didn't raise much copper.
After pickle, I brass brush, then hit the files.
I used a #2 cut half round ring file for the inside, followed by a #4 cut half round file, then a black silicone wheel on my flex shaft to remove an scratches left by the file.
6. Now comes clean up. After filing away the solder, I start with a yellow 80 grit 3M wheel, then follow with white 120 grit, red 220 grit, the blue 400 grit
I keep a scrap piece of GF wire close by to compare color- this is after just the first sanding with the yellow wheel and almost all of the pink cast is gone.
The picture above is after 400 grit and you should see that the color match is almost perfect, the brassy yellow of the solder is gone and this ring is now ready for me to hammer and finish down through 1200, pumice and a final polish with rouge and ZAM.
There is never just one way to do anything with metal. This is just how I work with gold fill. I have used this method for rings, bangles and bezels and my results have been fairly consistent. This is just one way, I am sure there are others. Each person that works with metal has their own tips and tricks. I enjoy learning how everyone does things so I have options in my bag when the soldering Gods aren't with me or things just aren't going well in general.
I hope you will also enjoy some of the tutorials from my other teammates and learn a few of their tricks too!
I know I am looking forward to adding the list of blogs below as the other tutorials become ready for prime time. So please come back every few days and learn a trick or two!
Here are the rest of the participating bloggers each with something special they do and hope to share!
VCArtisanOriginals
Sylvia Anderson
Metals Addict
Lilian Ginebra
Esmeralda
Amy Estelle
Stacy
Mary Anne Karren
Shannon of Gifted Designs
Pennee- All Wired Up Jewelry Designs
Jessica @ Abella Blue
Elizabeth Brown - resurrectionsilver.blogspot.com
How to Make a Ring with 14k Gold Fill Wire
First- start with good material from a reputable supplier. Make sure you are using 14/20 or 14k Gold fill, or at minimum 12/20. Nothing worse than heating something and finding out it's plated as the gold peels off.
Supplies you will need:
Cupronil, Battern's flux or Boric acid and denatured alcohol
Yellow GF solder- there are some better than others, my preference is the paste from Otto Frei or the sheet from Hoover & Strong.
Acid pickle- hot -and possibly super pickle (half pickle and half hydrogen peroxide)
Flex shaft or Dremel- for your wheels- If you don't own a rotary good wet/dry sand paper starting with 100 grit works just fine.
Silicone abrasive wheel- black (this one really cuts through metal so go easy with it)
abrasive wheels- 3M, 80 grit down through pumice
Ring files #2 and #4 cut, other files as needed
polishing compound- my preference is rouge then ZAM
1. Measure and cut your wire to size for your ring. For this ring I used 12 gauge 14/20 GF
2. Bend around mandrel and file ends so they are flush and tight- no light at all in the join area
3. Take your formed ring to your soldering area and coat well with flux on both sides- use a soldering pick or tweezers to flip the ring. If you touch the gold, coat it again. These flux materials protect from fire scale and also reduce the amount of copper alloy that will rise to the surface when GF is heated. The more copper you raise, the more work you have to do to clean and polish after soldering.
4. Heat your ring with a low flame all over to dry the flux, you should see a white coating covering the entire ring. If you have bare spots, more flux is needed. The one in the photo is just right- no shiny spots!
5. For the example above I used Cupronil spray flux- Next I add paste solder and just put it on the seam inside the ring join because I want to pull it through. I heat the ring all over again just to warm it. With gold or gold fill, you only need to heat on either side of the join. Remember, the hotter you get GF the more copper you will raise and the more work you make for yourself for clean up- I am all about less work for cleaning up my own mess. So, heat on medium to hot flame, alternating back and forth on either side of the join so the metal heats evenly. The solder paste will flow through the join and then stop heating immediately.
As you can see, I used a bit too much paste, but in my experience too much is a bit better than too little. If you use too little, sometimes you have to flip the piece over, add more solder and heat again. My preference, I'd rather file away excess solder than reheat and have my GF turn orange red from copper. As you can see, this ring is a bit pink, but the flux did it's job and I used just enough heat to flow the solder without getting the ring too hot. The solder is not the exact color of GF so you do have to file. I put this in a pickle bath- no need for super pickle since I was able to control the heat and didn't raise much copper.
After pickle, I brass brush, then hit the files.
I used a #2 cut half round ring file for the inside, followed by a #4 cut half round file, then a black silicone wheel on my flex shaft to remove an scratches left by the file.
6. Now comes clean up. After filing away the solder, I start with a yellow 80 grit 3M wheel, then follow with white 120 grit, red 220 grit, the blue 400 grit
I keep a scrap piece of GF wire close by to compare color- this is after just the first sanding with the yellow wheel and almost all of the pink cast is gone.
The picture above is after 400 grit and you should see that the color match is almost perfect, the brassy yellow of the solder is gone and this ring is now ready for me to hammer and finish down through 1200, pumice and a final polish with rouge and ZAM.
There is never just one way to do anything with metal. This is just how I work with gold fill. I have used this method for rings, bangles and bezels and my results have been fairly consistent. This is just one way, I am sure there are others. Each person that works with metal has their own tips and tricks. I enjoy learning how everyone does things so I have options in my bag when the soldering Gods aren't with me or things just aren't going well in general.
I hope you will also enjoy some of the tutorials from my other teammates and learn a few of their tricks too!
I know I am looking forward to adding the list of blogs below as the other tutorials become ready for prime time. So please come back every few days and learn a trick or two!
Here are the rest of the participating bloggers each with something special they do and hope to share!
VCArtisanOriginals
Sylvia Anderson
Metals Addict
Lilian Ginebra
Esmeralda
Amy Estelle
Stacy
Mary Anne Karren
Shannon of Gifted Designs
Pennee- All Wired Up Jewelry Designs
Jessica @ Abella Blue
Elizabeth Brown - resurrectionsilver.blogspot.com
Friday, December 23, 2011
Happy Holidays !!!!!
I wanted to be sure to say a huge thank you to all my customers and friends for a super holiday season and to say Happy Holidays, Merry Christmas, Happy Hanukkah and Happy Kwanza. Whatever or however you celebrate the season be safe, enjoy friends and family and take time to relax and enjoy.
My shop http://www.etsy.com/shop/PPennee is still showing goodies for sale, but I am officially on vacation for a few days until December 26th. I had such a lovely holiday season, with wonderful understanding customers and packages that all seemed to arrive at their proper destination. (Heaves a big sigh of relief over that). I made a few new things just for the holidays and did some custom items I thought turned out just great. Check out the gold stack ring set- ordered by an engaged couple for his mom and her future mother-in-law
I also had a special request to do a spoon ring- of all things it seems these are very popular still
But best of all, I got an early Christmas present, my new granddaughter Alexandra Rose born on December 8. Ally is very happy to be loved by many but is especially enthralled with her big sister Olivia who sings to her and tells her stories.
I am looking forward to a full week of time spent with my family (off from the full time job too!!!!) and getting back to the bench after the holidays.
Wishing you all a fantastic holiday!
My shop http://www.etsy.com/shop/PPennee is still showing goodies for sale, but I am officially on vacation for a few days until December 26th. I had such a lovely holiday season, with wonderful understanding customers and packages that all seemed to arrive at their proper destination. (Heaves a big sigh of relief over that). I made a few new things just for the holidays and did some custom items I thought turned out just great. Check out the gold stack ring set- ordered by an engaged couple for his mom and her future mother-in-law
I also had a special request to do a spoon ring- of all things it seems these are very popular still
But best of all, I got an early Christmas present, my new granddaughter Alexandra Rose born on December 8. Ally is very happy to be loved by many but is especially enthralled with her big sister Olivia who sings to her and tells her stories.
I am looking forward to a full week of time spent with my family (off from the full time job too!!!!) and getting back to the bench after the holidays.
Wishing you all a fantastic holiday!
Tuesday, November 1, 2011
I Have A Winner!!!
I am excited to announce the winner of my very first blog give away! Congratulations to Lauren S who is the winner of my sterling floral pattern bangle. Lauren's name was chosen from using a random drawing program on random.org. I have made this drawing entrant accessible so anyone who entered can verify their participation but not see the names of the other entrants. Any entrant can go to http://www.random.org/draws/details/?draw=8009 and check to make sure I didn't miss their entry. I had a total of 60 entries!!!
I have e-mailed Lauren this morning to notify her . Lauren has 3 days to get back to me to accept her prize. If I don't hear from her, the second name from the drawing will be posted here on my blog and on my facebook business page https://www.facebook.com/AllWiredUpJewelryDesigns
I appreciate all who took time to enter my give away and to visit my new website http://www.allwiredupjewelrydesigns.com/ . I do hope some or all of you will come back to shop or visit to see new items as I add them. Gift giving season is upon us - it always gets here so fast!!!!
Thank you all for participating!!
I have e-mailed Lauren this morning to notify her . Lauren has 3 days to get back to me to accept her prize. If I don't hear from her, the second name from the drawing will be posted here on my blog and on my facebook business page https://www.facebook.com/AllWiredUpJewelryDesigns
I appreciate all who took time to enter my give away and to visit my new website http://www.allwiredupjewelrydesigns.com/ . I do hope some or all of you will come back to shop or visit to see new items as I add them. Gift giving season is upon us - it always gets here so fast!!!!
Thank you all for participating!!
Subscribe to:
Posts (Atom)