I don't think I can express in words the feeling of joy and pride that I have felt the last two days for just finishing and launching my new website http://www.allwiredupjewelrydesigns.com/. I have for so long wanted to be able to print my own shop name on my business cards when I mail out a piece of jewelry, now I can!!!
I have always been happy with Etsy and with my shop and friends I have made, that said, I made the mistake of being a buyer first, then opening a shop so I was stuck with my buyer name. Having a shop http://www.etsy.com/shop/PPennee really doesn't draw anyone to looking for jewelry to my way of thinking, my real shop name All Wired Up Jewelry Designs is a sub-header under my name. I wanted a real jewelry shop!!
Other reasons to want my own website and shopping venue:
Etsy gets a percentage of every sale I make and a small amount for me to list a new item. If I want my items to stay on the first few pages of a search, I pay to re-list the item which costs me again. The Paypal takes a percentage when a customer purchases something. I told myself over the last few years that this was ok and to think of it as part of my meager advertising budget. But now that silver s approaching $40 and ounce, I feel that having my own website will save me all those fees and I'll be able to hold off from raising my prices to buy more silver to continue filling orders and making new things. If I concentrate on Etsy, I would have to raise my prices or just stop making new things. That just wasn't in the plan!
Reason number 2: It's all mine! I can set my own shipping policies, return policies and refund policies without the hassle of having to ask Etsy to refund any fees and charges I lost. Privacy- big one for me- I am starting to get concerned that Etsy is trying to become the Facebook of jewelry sales. They want me to join teams and circles and unless my customers are savvy and set up their privacy filters, their purchases could be public knowledge. It's no one's business if you want to order a set of custom stack rings for your Mom for Mother's Day now is it??
Third reason: You don't have to "join" my website! You can just come shop and be done with it. I don't want to join a Nordstrom's Club or even Target- why do I need my customers to sign up with Etsy to shop with me?? Their rules, not mine! Sure, you can register on my website if you like, you can bookmark me, make me a favorite or none of the above, but you don't have to!!! I like that.
Number 4- I think websites make customizing so much easier!!!! In the world of Etsy, if I have a necklace with an 18 inch chain and a garnet faceted briolette trimming it, a potential customer has to "convo" me mutiple times to ask about additional chain length if wanted, other gemstone choices and possible additional costs. All easy peasy on my website- it's all about the little drop down box! The choices are all there and you just check the box for what you want to add, put it together just the way you want and head to check out.
This should give you an idea of how it looks- go ahead and play- you never have to really check out unless you want to! http://shop.allwiredupjewelrydesigns.com/Lotus-Sterling-Tag-Gemstone-Necklace-Customize-It-47.htm.
This stack ring is another example! In my shop, you can choose any stone you want in this 5mm size! A separate listing for 4mm and 6mm with every stone I own listed- so much easier than getting skipped over because I don't have the particular stone listed you are looking for. And yes, I still order a stone you want and I don't have!
http://shop.allwiredupjewelrydesigns.com/Artisan-Sterling-Stack-Rings-5mm-Gemstone-Made-to-Order-15.htm this is my website listing for all the different possibilities for you to create a special ring in the 5mm size.
Setting up the website was so hard for me to do. I am not a big computer geek. I bugged lots of friends and called the poor help desk at the website daily. But that's a whole different blog to write.
Mimi and her girls
Mimi and her girls
Thursday, March 31, 2011
Saturday, March 19, 2011
Playing with Color
I had a lot of fun yesterday playing with oxidizing some new pieces I did so I thought I'd share in pictures what I did and talk about what I learned.
First let me say, liver of sulfur stinks! So does ammonia. Unfortunately, in the world of metal and oxidizing, to get pretty color, you have to use one or both in some sort of combination. For many years, dry LOS was the only thing available and it was sold in big containers and came in chunks that you had to break up and add to hot water to dissolve- Phew- the smell- think rotten eggs! And if any moisture got into your supply it turned green and wouldn't work to darken your metal. Luckily someone came up with LOS gel a few years ago and at least the problem of throwing away your ruined supply regularly was solved- it still stinks, but it's very stable and is easy to mix, no punding chunks so it will dissolve.
I don't do huge amounts of jewelry when I play with live of sulfur, mainly because I'm never sure if I'm going to like the results. In hot water LOS will turn sterling or fine silver dark black in about 20-30 seconds. After you get your silver out, you have to dry it and go over it with very fine steel wool to bring up the shine on the raised areas leaving a very dark background. As you can see from this pendant- it can look very attractive, but it's not for every piece of jewelry.
I've been more and more interested in precious metal clay (PMC) and all the options it allows me to explore. I love anything botanical, flowers, trees, leaves! So I wanted to press some leaves from my garden into my clay and make some earrings and pendants for my shop on Etsy http://www.etsy.com/shop/PPennee. I already had a few pieces I had oxidized with LOS, but they were the dark variety like the pendant below.
I picked some leaves from one of my favorite ground covers, Cranesbill geranium which I love because it gets pretty pink flowers in the spring and summer, but at least where I live in MD, it never really dies back totally. It gets pretty reds and oranges on the leaves in fall and I can still at least see the leaves in winter if the snow isn't too deep. Right now- little green and reddish leaves are popping out all over my plant! I chose to do a round pendant and earrings to match. This is what they looked like after I pressed the leaves, dried and fired and then put them in the tumbler to work harden and shine up a bit.
It always amazes me how much detail you see from a leaf- all the texture, veining, even a little piece of the stem where is picked the leaf from the plant. What I hoped to accomplish was to get some of the color I actually see in the garden and not lose the detail of the leaf.
I knew from previous experiments that hot was not what I wanted, nor was cold. Cold LOS gives you what almost looks like gold- nice, but not what I was aiming for. So I tried luke warm, slightly hotter ( praise for the microwave)- I got a lot of yellow and brown, some red, still not what I wanted. I have lots of team mates on my Aspiring Metals Team on Etsy that work in copper. Many have mentioned using ammonia to get that great green verdigris color that looks so great. So I added a little ammonia, starting with about a teaspoon at a time.
Each time I dipped in my silver it got a little more interesting. Keep in mind, if you don't get what you want, you have to keep cleaning off the piece and taking it back to almost shiny silver to start again! After about 3 tries, medium warm temperature and 3 tsp of ammonia, this is what I got!
I have to say, my leaves aren't blue in the garden, but I was really pleased with the effects I got- and I did get some reds and lavender which i thought looked pretty cool!
Feel free to comment and let me know what you think. I hope you enjoyed reading a little about playing with color.
First let me say, liver of sulfur stinks! So does ammonia. Unfortunately, in the world of metal and oxidizing, to get pretty color, you have to use one or both in some sort of combination. For many years, dry LOS was the only thing available and it was sold in big containers and came in chunks that you had to break up and add to hot water to dissolve- Phew- the smell- think rotten eggs! And if any moisture got into your supply it turned green and wouldn't work to darken your metal. Luckily someone came up with LOS gel a few years ago and at least the problem of throwing away your ruined supply regularly was solved- it still stinks, but it's very stable and is easy to mix, no punding chunks so it will dissolve.
I don't do huge amounts of jewelry when I play with live of sulfur, mainly because I'm never sure if I'm going to like the results. In hot water LOS will turn sterling or fine silver dark black in about 20-30 seconds. After you get your silver out, you have to dry it and go over it with very fine steel wool to bring up the shine on the raised areas leaving a very dark background. As you can see from this pendant- it can look very attractive, but it's not for every piece of jewelry.
I've been more and more interested in precious metal clay (PMC) and all the options it allows me to explore. I love anything botanical, flowers, trees, leaves! So I wanted to press some leaves from my garden into my clay and make some earrings and pendants for my shop on Etsy http://www.etsy.com/shop/PPennee. I already had a few pieces I had oxidized with LOS, but they were the dark variety like the pendant below.
I picked some leaves from one of my favorite ground covers, Cranesbill geranium which I love because it gets pretty pink flowers in the spring and summer, but at least where I live in MD, it never really dies back totally. It gets pretty reds and oranges on the leaves in fall and I can still at least see the leaves in winter if the snow isn't too deep. Right now- little green and reddish leaves are popping out all over my plant! I chose to do a round pendant and earrings to match. This is what they looked like after I pressed the leaves, dried and fired and then put them in the tumbler to work harden and shine up a bit.
It always amazes me how much detail you see from a leaf- all the texture, veining, even a little piece of the stem where is picked the leaf from the plant. What I hoped to accomplish was to get some of the color I actually see in the garden and not lose the detail of the leaf.
I knew from previous experiments that hot was not what I wanted, nor was cold. Cold LOS gives you what almost looks like gold- nice, but not what I was aiming for. So I tried luke warm, slightly hotter ( praise for the microwave)- I got a lot of yellow and brown, some red, still not what I wanted. I have lots of team mates on my Aspiring Metals Team on Etsy that work in copper. Many have mentioned using ammonia to get that great green verdigris color that looks so great. So I added a little ammonia, starting with about a teaspoon at a time.
Each time I dipped in my silver it got a little more interesting. Keep in mind, if you don't get what you want, you have to keep cleaning off the piece and taking it back to almost shiny silver to start again! After about 3 tries, medium warm temperature and 3 tsp of ammonia, this is what I got!
I have to say, my leaves aren't blue in the garden, but I was really pleased with the effects I got- and I did get some reds and lavender which i thought looked pretty cool!
Feel free to comment and let me know what you think. I hope you enjoyed reading a little about playing with color.
Thursday, March 10, 2011
Rings and Things - 86 and Counting
It's been too long again since I updated my post early this year on 104 things I wanted to make. So right now I have 86 items to go in the two flickr groups I joined, RAW - ring a week and THAW- thing a week. So here are just a few items I have completed to give you an idea of just how much torching and hammering I've been doing!
This was my first hand made hinge- I got double duty out of this ocean jasper pendant. It was part of THAW and also my entry in the monthy design challenge with the aspiring metals team, this months being Movement. Well, it does move, but I got no where close to winning against architectural structures that spouted water, spinnin g rings and such, but I did learn how to make a hinge and I loved these stones. Ocean jasper always reminds me of colored bubbles kids play with in the tub.
Another THAW entry- again, I got double credit- for myself, because I did a rough prong setting (we all have to start somewhere) and another THAW entry.
Take your breath away? This was sold as fast as I listed it in my Etsy shop. A gorgeous piece of aquamarine rough, again a first for me to set something other than a calibrated cabochon, and this one was a RAW entry.
The last RAW entry I'll show off is what started to be a riveted ring. Rivets are just so versatile and it's not messy at all to rivet 2 pieces together, unlike soldering with all the flux and pickle and yukky quench water. But, it was not meant to be. No matter what size wire I hammered, I couldn't get the top rivet to be large enough to show that amount of copper I wanted for a pretty contrast. So, I made a copper ball and soldered it onto the sterling wrap ring. Seemed to me that shiny copper just set off the texture perfectly. I did the texture by hammering the silver on the sidewalk before forming. I have this listed in my shop as a made to order item since I think it will be a great casual piece to wear this season.
My last THAW entry- tryng to get more interesting pendants and earrings, I decided on precious metal clay as my medium. I love playing play dough with my granddaughter and this isn't much different- just way more expensive. I made an impression of a pretty dahlia, then used a pmc syringe to create a setting, fired to burn off the clay, which leave almost pure silver (.999 instead of sterling that is .925) and then set a pink CZ in the center.
I just have so many things I want to learn to do with metal and there really is so little time. Hope you enjoyed my little picture update. Wish me luck, I only have 86 more things to make!
This was my first hand made hinge- I got double duty out of this ocean jasper pendant. It was part of THAW and also my entry in the monthy design challenge with the aspiring metals team, this months being Movement. Well, it does move, but I got no where close to winning against architectural structures that spouted water, spinnin g rings and such, but I did learn how to make a hinge and I loved these stones. Ocean jasper always reminds me of colored bubbles kids play with in the tub.
Another THAW entry- again, I got double credit- for myself, because I did a rough prong setting (we all have to start somewhere) and another THAW entry.
Take your breath away? This was sold as fast as I listed it in my Etsy shop. A gorgeous piece of aquamarine rough, again a first for me to set something other than a calibrated cabochon, and this one was a RAW entry.
The last RAW entry I'll show off is what started to be a riveted ring. Rivets are just so versatile and it's not messy at all to rivet 2 pieces together, unlike soldering with all the flux and pickle and yukky quench water. But, it was not meant to be. No matter what size wire I hammered, I couldn't get the top rivet to be large enough to show that amount of copper I wanted for a pretty contrast. So, I made a copper ball and soldered it onto the sterling wrap ring. Seemed to me that shiny copper just set off the texture perfectly. I did the texture by hammering the silver on the sidewalk before forming. I have this listed in my shop as a made to order item since I think it will be a great casual piece to wear this season.
My last THAW entry- tryng to get more interesting pendants and earrings, I decided on precious metal clay as my medium. I love playing play dough with my granddaughter and this isn't much different- just way more expensive. I made an impression of a pretty dahlia, then used a pmc syringe to create a setting, fired to burn off the clay, which leave almost pure silver (.999 instead of sterling that is .925) and then set a pink CZ in the center.
I just have so many things I want to learn to do with metal and there really is so little time. Hope you enjoyed my little picture update. Wish me luck, I only have 86 more things to make!
Wednesday, February 23, 2011
Rock On!
I'll bet you thought I was going to talk about music from my title- nope, I'm here to talk about rocks! Big ones, small ones, shiny ones and tall ones! Being part of the Aspiring Metals Team monthly blogroll makes me think about all sorts of fun things that have happened to me since I became a metalsmith. One is an additction to all sorts of rocks. Some talk to me and I know right away what they want to be, a ring, a pendant, part of a bracelet. Some just want me to look at them, they aren't quite ready to speak yet- they are my babies and I can wait patiently until they are ready to say what I need to hear to create something to show their beauty and allow them to go out into the world!
I'll start with big ones and one tall one. These are some of my favorites because I love the colors and movement in them. The big center cherry creek jasper has already spoken- she wants to be a brooch set on a lovely hand stamped piece of silver with vines and hand made cherry blossoms. The poppy jasper in the upper left wants to be a pendant but hasn't mentioned yet what sort of embellishment will suit. The dino bone (yes- real dinosaur bone) is a very reticent stone- refuses to say anything at all. The Botswana agate on the bottom left and the rainforest jasper have started to babble some, but no real direction for me yet!
Next would be the shiny ones. They talk way to much- me, me, me! They all want to be set in a ring all alone so they can sparkle and shine, catch everyone's attention and be adored. It gets really noisy in my studio sometimes as I head to my stone corner looking for a new project. The loudest of these are the apatite- the pretty blue green ones left front- they know they are loved but still must always be first pick!
Small ones- I love the little guys, shiny and faceted, rough crystals and polished stones. They come to me knowing they will be beautiful rings and sometimes just want to be held and cuddled. They don't have a lot to say, and seem to be very patient to wait until it's their turn. I look for intense defined color in my small stones. Rings are very special and very personal items for the wearer so they must speak to the wearer as well as to me.
Next are just a few of my favorites. I love stones with pictures or that remind me of something I have seen or read. The Bruneau jasper top left reminds me of the book Dune with dark sky and sand everywhere- what's lurking beneath? The Sonioran Sunrise on top is just that- a gorgeous stone that has it's own internal sun that shines all the time. On the botoom right an Owhee Jasper that looks like a big dust storm rolling through the desert and on the left a picture jasper. A lonely outpost in the desert stands sentinel over the cactus and tumbleweed.
So those are just a few of my rocks. I have a bad addiction to rock, so I couldn't possibly show the all or I'd be hogging up way too much blog space. I also want you to have time to visit some of my teammates to see their beautiful stone collections and read their stories, some will really surprise and captivate you!
The Aspiring Metals Team list of stone addicts is below- have fun reading their stories!
Now if you want to see some really exciting collections, check out these links below of the awesome Aspiring Metalsmiths.
Autumn Bradley - http://www.autumnbradley.blogspot.com/
Clarity @ Scrollwork Designs - http://thesquarepegnation.blogspot.com/
Stacy Low - http://www.formandfunktionaccessories.blogspot.com
Chrissi Lynn Designs - http://www.chrissilynn.blogspot.com
Sylvia Anderson - http://www.sylviaanderson.blogspot.com/
Jessica @ Abella Blue - http://www.abellablue.com/blog
Contemporary Jewelry by Beatriz Fortes - http://cjbf.blogspot.com/
Esmeralda - http://jewelry-by-silverblueberry.blogspot.com/
Steph Stargell - http://www.stephstargell.com
Pennee - http://allwiredupjewelrydesigns.blogspot.com/
Silver Pearl Jewelry and Metalworks - http://silverpearlmetalworks.wordpress.com/2011/02/20/show-us-your-stones/#more-4
Claire - brightstar109.blogspot.com/
AristiKat- http://artistikat-scratchingpost.blogspot.com/
I'll start with big ones and one tall one. These are some of my favorites because I love the colors and movement in them. The big center cherry creek jasper has already spoken- she wants to be a brooch set on a lovely hand stamped piece of silver with vines and hand made cherry blossoms. The poppy jasper in the upper left wants to be a pendant but hasn't mentioned yet what sort of embellishment will suit. The dino bone (yes- real dinosaur bone) is a very reticent stone- refuses to say anything at all. The Botswana agate on the bottom left and the rainforest jasper have started to babble some, but no real direction for me yet!
Next would be the shiny ones. They talk way to much- me, me, me! They all want to be set in a ring all alone so they can sparkle and shine, catch everyone's attention and be adored. It gets really noisy in my studio sometimes as I head to my stone corner looking for a new project. The loudest of these are the apatite- the pretty blue green ones left front- they know they are loved but still must always be first pick!
Small ones- I love the little guys, shiny and faceted, rough crystals and polished stones. They come to me knowing they will be beautiful rings and sometimes just want to be held and cuddled. They don't have a lot to say, and seem to be very patient to wait until it's their turn. I look for intense defined color in my small stones. Rings are very special and very personal items for the wearer so they must speak to the wearer as well as to me.
Next are just a few of my favorites. I love stones with pictures or that remind me of something I have seen or read. The Bruneau jasper top left reminds me of the book Dune with dark sky and sand everywhere- what's lurking beneath? The Sonioran Sunrise on top is just that- a gorgeous stone that has it's own internal sun that shines all the time. On the botoom right an Owhee Jasper that looks like a big dust storm rolling through the desert and on the left a picture jasper. A lonely outpost in the desert stands sentinel over the cactus and tumbleweed.
So those are just a few of my rocks. I have a bad addiction to rock, so I couldn't possibly show the all or I'd be hogging up way too much blog space. I also want you to have time to visit some of my teammates to see their beautiful stone collections and read their stories, some will really surprise and captivate you!
The Aspiring Metals Team list of stone addicts is below- have fun reading their stories!
Now if you want to see some really exciting collections, check out these links below of the awesome Aspiring Metalsmiths.
Autumn Bradley - http://www.autumnbradley.blogspot.com/
Clarity @ Scrollwork Designs - http://thesquarepegnation.blogspot.com/
Stacy Low - http://www.formandfunktionaccessories.blogspot.com
Chrissi Lynn Designs - http://www.chrissilynn.blogspot.com
Sylvia Anderson - http://www.sylviaanderson.blogspot.com/
Jessica @ Abella Blue - http://www.abellablue.com/blog
Contemporary Jewelry by Beatriz Fortes - http://cjbf.blogspot.com/
Esmeralda - http://jewelry-by-silverblueberry.blogspot.com/
Steph Stargell - http://www.stephstargell.com
Pennee - http://allwiredupjewelrydesigns.blogspot.com/
Silver Pearl Jewelry and Metalworks - http://silverpearlmetalworks.wordpress.com/2011/02/20/show-us-your-stones/#more-4
Claire - brightstar109.blogspot.com/
AristiKat- http://artistikat-scratchingpost.blogspot.com/
Monday, January 24, 2011
How Far Have I Come?
Our Aspiring Metals Team Blog Roll for this month was about showing our early work or even our first work. It made me start to think of how far I have come in such a short time, how much I've learned and how much fun I've had working with metal and creating jewelry that lots of customers own and love.
I think like most metalsmiths, I started with beading then went on to wire wrapping and creating with a combination of stones, gemstones and wire. Well, as much as I thought some of these pieces just rocked, they weren't what I really loved and wanted for myself. Take a look at this- I thought I was the cats meow when I first made this necklace for a New Years party I was attending!
I called this my Champagne on Ice necklace and boy was I proud of it. Now all I see are mistakes, some messy wire wrapping on some of my stones and definitely not really me!
But I jumped ahead a bit- my first work was just beading- so string it on, crimp the ends put a clasp on and you've got a necklace or bracelet. Well, it sounds easy, but when I started, my crimps popped off or I didn't know of "crimp covers" that made everything look nice. This is an example of when I conquered crimp covers!
So then I took a fusing class and got totally hooked on playing with the torch. How much fun this was, I could fuse circles, make shapes, bracelets, hammer things, this was great!! But not without pitfalls mind you- lots of melted metal that never fused, lots of bubbles in the metal that made lumpy circles. Ahh- the learning process can be so frustrating. But I finally conquered fusing and did lots of circles, squares, teardrops and ovals!
This is one of my favorites to this day! This bracelet is fused fine silver which I did solder together. I was already itching to play with more fire!
Then came PMC- metal clay- this is just fine silver in clay form. It really has it's challenges, but so many possibilities. Again- took a class, had a ball- but realized to be really good at this, I would have to take lots more classes and spend an awful lot on a kiln and other supplies. So, I made a few cute charms and a pendant and decided I would put PMC on hold for just a bit. This is my first attempt at a pendant. This was not my design at all- it was made in a class given by Dina Alexander on Etsy http://www.etsy.com/shop/dinaalexander and it was her design she allowed me to make since I just oohed and ahhed over how beautiful hers was. And hers is sooo much prettier, but I still loved all the possibilities with texture and dimension.
So now on to my first metal work and the first challenge I ever cried over - I had hearts in mind for earrings. . I was so proud of myself for just being able to make something from scratch. I asked questions, watched you tube videos and made these earrings!
They don't really match- the ear wires would not solder on and stay put- what a mess! At least now I know you saw your earrings out together so they will at least match even if they aren't perfect!!
Now I think I can actually say I make some pretty things but still have a lot of challenges ahead with learning new skills and perfecting those I have under my belt! In fact this is my first attempt at rustic prong setting and I was very pleased with the results!!
I hope you enjoyed taking this little journey with me and I hope if you found my journey interesting at all, you will take a peek and read about some of the others on my team below!
Jessica - http://www.abellablue.com/blog
Clarity - http://www.thesquarepegnation.blogspot.com/
Claire - http://brightstar109.blogspot.com/
Stacy - http://formandfunktionaccessories.blogspot.com/
Pennee - http://allwiredupjewelrydesigns.blogspot.com/
Brandy - http://thefrogspond.wordpress.com/
Gloria - http://gloria-hemlockhollow.blogspot.com/
Joy - http://www.joypeckjoy.blogspot.com/
Autumn - http://www.autumnbradley.blogspot.com/
Gayle - http://www.thisartistsjourney.blogspot.com/
Sylvia - http://www.sylviaanderson.blogspot.com/
Esmeralda - http://jewelry-by-silverblueberry.blogspot.com/
I think like most metalsmiths, I started with beading then went on to wire wrapping and creating with a combination of stones, gemstones and wire. Well, as much as I thought some of these pieces just rocked, they weren't what I really loved and wanted for myself. Take a look at this- I thought I was the cats meow when I first made this necklace for a New Years party I was attending!
I called this my Champagne on Ice necklace and boy was I proud of it. Now all I see are mistakes, some messy wire wrapping on some of my stones and definitely not really me!
But I jumped ahead a bit- my first work was just beading- so string it on, crimp the ends put a clasp on and you've got a necklace or bracelet. Well, it sounds easy, but when I started, my crimps popped off or I didn't know of "crimp covers" that made everything look nice. This is an example of when I conquered crimp covers!
So then I took a fusing class and got totally hooked on playing with the torch. How much fun this was, I could fuse circles, make shapes, bracelets, hammer things, this was great!! But not without pitfalls mind you- lots of melted metal that never fused, lots of bubbles in the metal that made lumpy circles. Ahh- the learning process can be so frustrating. But I finally conquered fusing and did lots of circles, squares, teardrops and ovals!
This is one of my favorites to this day! This bracelet is fused fine silver which I did solder together. I was already itching to play with more fire!
Then came PMC- metal clay- this is just fine silver in clay form. It really has it's challenges, but so many possibilities. Again- took a class, had a ball- but realized to be really good at this, I would have to take lots more classes and spend an awful lot on a kiln and other supplies. So, I made a few cute charms and a pendant and decided I would put PMC on hold for just a bit. This is my first attempt at a pendant. This was not my design at all- it was made in a class given by Dina Alexander on Etsy http://www.etsy.com/shop/dinaalexander and it was her design she allowed me to make since I just oohed and ahhed over how beautiful hers was. And hers is sooo much prettier, but I still loved all the possibilities with texture and dimension.
So now on to my first metal work and the first challenge I ever cried over - I had hearts in mind for earrings. . I was so proud of myself for just being able to make something from scratch. I asked questions, watched you tube videos and made these earrings!
They don't really match- the ear wires would not solder on and stay put- what a mess! At least now I know you saw your earrings out together so they will at least match even if they aren't perfect!!
Now I think I can actually say I make some pretty things but still have a lot of challenges ahead with learning new skills and perfecting those I have under my belt! In fact this is my first attempt at rustic prong setting and I was very pleased with the results!!
I hope you enjoyed taking this little journey with me and I hope if you found my journey interesting at all, you will take a peek and read about some of the others on my team below!
Jessica - http://www.abellablue.com/blog
Clarity - http://www.thesquarepegnation.blogspot.com/
Claire - http://brightstar109.blogspot.com/
Stacy - http://formandfunktionaccessories.blogspot.com/
Pennee - http://allwiredupjewelrydesigns.blogspot.com/
Brandy - http://thefrogspond.wordpress.com/
Gloria - http://gloria-hemlockhollow.blogspot.com/
Joy - http://www.joypeckjoy.blogspot.com/
Autumn - http://www.autumnbradley.blogspot.com/
Gayle - http://www.thisartistsjourney.blogspot.com/
Sylvia - http://www.sylviaanderson.blogspot.com/
Esmeralda - http://jewelry-by-silverblueberry.blogspot.com/
Saturday, January 15, 2011
104 Things I Want To Make This Year
I have lots of goals for my jewelry business and to help me along, I joined to groups this year - RAW and THAW. Sounds nothing like jewelry related organizations, but they are two Flickr groups that have crazy women and men making a Ring A Week or a Thing A Week and posting to the group. Last year someone came up with Ring A Day and I was dumbfounded that anyone could even think of doing this. No way- I have a full time job! But hey, a Ring a week is doable. Then someone on out aspiring metals team said, why not just make a thing a week- not just rings. So, here are the 2 groups - http://www.flickr.com/groups/ringaweek/ for rings and http://www.flickr.com/groups/thaw2011/ for anything and everything else!
My first entry for RAW was one of my favorites to date- a Peruvian pink opal which I have listed in my Etsy shop http://www.etsy.com/listing/65499989/pink-peruvian-opal-ring-size-7-ooak
So my first THAW entry I had Valentine" Day in mind (as did a ton of other people it seems) so I made acute little heart necklace with a dainty little pearl.
And week 2 I submitted this Rainforest Jasper pendant necklace wich has the most amazing colors!
So here I sit now, instead of making my RAW 2 entry, so I have to run, but I hope you'll take time now and then and check out the 2 fun groups and all the great entries!
My first entry for RAW was one of my favorites to date- a Peruvian pink opal which I have listed in my Etsy shop http://www.etsy.com/listing/65499989/pink-peruvian-opal-ring-size-7-ooak
So my first THAW entry I had Valentine" Day in mind (as did a ton of other people it seems) so I made acute little heart necklace with a dainty little pearl.
And week 2 I submitted this Rainforest Jasper pendant necklace wich has the most amazing colors!
So here I sit now, instead of making my RAW 2 entry, so I have to run, but I hope you'll take time now and then and check out the 2 fun groups and all the great entries!
Friday, December 10, 2010
Dreaming of New Techniques with Metal
There are lots of things people dream about, a special trip to somewhere exotic and beautiful, a new dream house. I am a member of a great group on Etsy called the Aspiring Metalsmiths Team so my dreams revolve around learning new techniques so I can create some of those gorgeous designs swirling around in my brain.
I would like to share my little pipe dreams so you can either have a good chuckle over my aspirations or root me on while I keep challenging myself to go to the next level with my skills.
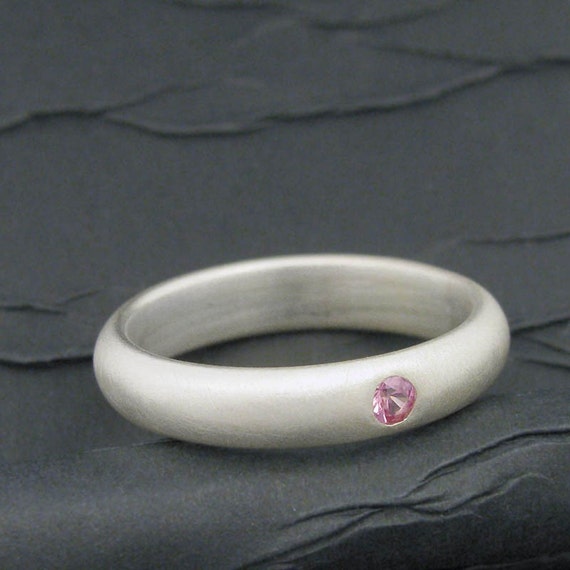
My first new technique I promised myself I would conquer is flush setting or as it is sometimes called "false gypsy setting. This technique involves drilling into a piece of metal, getting the oh so perfect size that matches the diameter of your shiny faceted stone, with a seat to hold it level and then very carefully burnished down the metal around the hole over the stone so it is "flush" or level with the surface of the metal. Below is an example from one of what we fondly refer to as one of the "big dogs" in metalsmithing on Etsy. This ring is from tinkertown- http://www.etsy.com/shop/tinkertown?ref=seller_info and I think it's a beautiful example of the beauty and simplicity of flush setting. The possibilities of this technique are just endless!
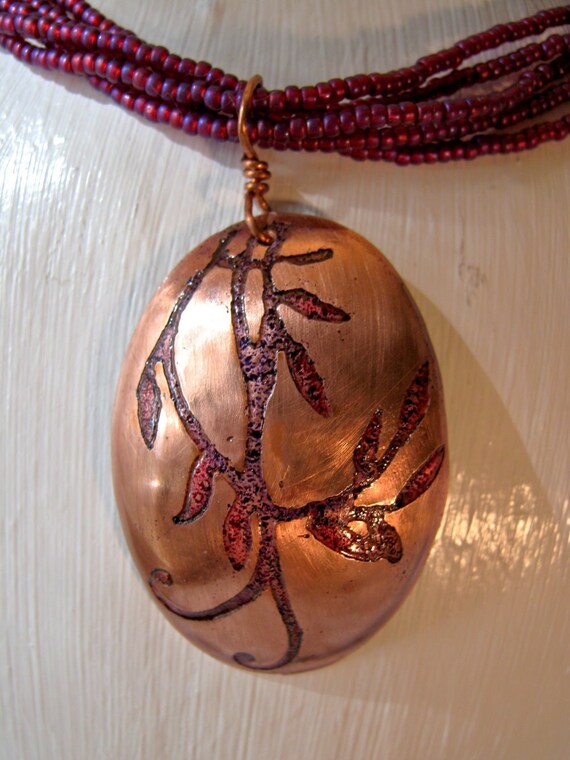
The second technique I would love to learn is etching on metal. Wow- Picture a piece of lace, very fine, very beautiful, then picture that pattern permanently etched onto a piece of metal and made into a gorgeous cuff bracelet that you can look at and admire the beautiful pattern over and over! It's like texture without the expensive rolling mill, texture plates and all he space you need to set up that big piece of equipment (not feasible in my little house). Basically, etching consists of an acid bath the eats away and a design or pattern that you have created by using a resist (something that prevents the acid from eating away the metal). The part where the resist is will stay smooth, the part where you have created your design gets eroded away and leaves a permanent design. Here is a picture of a lovely pendant created in copper by my teammate Asa Pearson of asapdesigns, http://www.etsy.com/shop/asapdesigns?ref=seller_info
As you can see from this picture, not only can you do a totally unique design, but you can add color!!!
I have a really long list of more things I'd like to lean, but those will have to come after I master these two. I hope you've enjoyed a little glimpse into my journey with metalsmithing!
I hope you've enjoyed seeing some examples of my aspirations for learning in the new year. If you'd like to see some examples of other metalsmith's dream techniques, just check out any of the blogs below and share our dreams.
I would like to share my little pipe dreams so you can either have a good chuckle over my aspirations or root me on while I keep challenging myself to go to the next level with my skills.
My first new technique I promised myself I would conquer is flush setting or as it is sometimes called "false gypsy setting. This technique involves drilling into a piece of metal, getting the oh so perfect size that matches the diameter of your shiny faceted stone, with a seat to hold it level and then very carefully burnished down the metal around the hole over the stone so it is "flush" or level with the surface of the metal. Below is an example from one of what we fondly refer to as one of the "big dogs" in metalsmithing on Etsy. This ring is from tinkertown- http://www.etsy.com/shop/tinkertown?ref=seller_info and I think it's a beautiful example of the beauty and simplicity of flush setting. The possibilities of this technique are just endless!
The second technique I would love to learn is etching on metal. Wow- Picture a piece of lace, very fine, very beautiful, then picture that pattern permanently etched onto a piece of metal and made into a gorgeous cuff bracelet that you can look at and admire the beautiful pattern over and over! It's like texture without the expensive rolling mill, texture plates and all he space you need to set up that big piece of equipment (not feasible in my little house). Basically, etching consists of an acid bath the eats away and a design or pattern that you have created by using a resist (something that prevents the acid from eating away the metal). The part where the resist is will stay smooth, the part where you have created your design gets eroded away and leaves a permanent design. Here is a picture of a lovely pendant created in copper by my teammate Asa Pearson of asapdesigns, http://www.etsy.com/shop/asapdesigns?ref=seller_info
I have a really long list of more things I'd like to lean, but those will have to come after I master these two. I hope you've enjoyed a little glimpse into my journey with metalsmithing!
I hope you've enjoyed seeing some examples of my aspirations for learning in the new year. If you'd like to see some examples of other metalsmith's dream techniques, just check out any of the blogs below and share our dreams.
- Gayle - http://thisartistsjourney.blogspot.com
- Jessica @ Abella Blue - www.abellablue.com/blog
- Sylvia Anderson - http://www.sylviaanderson.blogspot.com/
- Autumn Bradley - www.autumnbradley.blogspot.com
- Scrollwork Designs - www.thesquarepegnation.blogspot.com
- Claire - http://brightstar109.blogspot.com/
- Carole - http://www.caroleaxiumdesigns.com/journal/
- Heather - http://mistyridgedesigns.blogspot.com
- Brandy - http://thefrogspond.wordpress.com
- Esmeralda (SilverBlueberry) - http://jewelry-by-silverblueberry.blogspot.com/
- Stacy http://formandfunktionaccessories.blogspot.com/
- Steph Stargell Designs - http://stephstargell.com
Subscribe to:
Posts (Atom)