Mimi and her girls

Mimi and her girls
Mimi and her girls

Friday, December 10, 2010

Dreaming of New Techniques with Metal

There are lots of things people dream about, a special trip to somewhere exotic and beautiful, a new dream house. I am a member of a great group on Etsy called the Aspiring Metalsmiths Team so my dreams revolve around learning new techniques so I can create some of those gorgeous designs swirling around in my brain.

I would like to share my little pipe dreams so you can either have a good chuckle over my aspirations or root me on while I keep challenging myself to go to the next level with my skills.

My first new technique I promised myself I would conquer is flush setting or as it is sometimes called "false gypsy setting. This technique involves drilling into a piece of metal, getting the oh so perfect size that matches the diameter of your shiny faceted stone, with a seat to hold it level and then very carefully burnished down the metal around the hole over the stone so it is "flush" or level with the surface of the metal. Below is an example from one of what we fondly refer to as one of the "big dogs" in metalsmithing on Etsy. This ring is from tinkertown- http://www.etsy.com/shop/tinkertown?ref=seller_info and I think it's a beautiful example of the beauty and simplicity of flush setting. The possibilities of this technique are just endless!


The second technique I would love to learn is etching on metal. Wow- Picture a piece of lace, very fine, very beautiful, then picture that pattern permanently etched onto a piece of metal and made into a gorgeous cuff bracelet that you can look at and admire the beautiful pattern over and over! It's like texture without the expensive rolling mill, texture plates and all he space you need to set up that big piece of equipment (not feasible in my little house). Basically, etching consists of an acid bath the eats away and a design or pattern that you have created by using a resist (something that prevents the acid from eating away the metal). The part where the resist is will stay smooth, the part where you have created your design gets eroded away and leaves a permanent design. Here is a picture of a lovely pendant created in copper by my teammate Asa Pearson of asapdesigns, http://www.etsy.com/shop/asapdesigns?ref=seller_info


As you can see from this picture, not only can you do a totally unique design, but you can add color!!!

I have a really long list of more things I'd like to lean, but those will have to come after I master these two. I hope you've enjoyed a little glimpse into my journey with metalsmithing!

I hope you've enjoyed seeing some examples of my aspirations for learning in the new year. If you'd like to see some examples of other metalsmith's dream techniques, just check out any of the blogs below and share our dreams.

Wednesday, November 10, 2010

The Workspace - November Blog Challenge

My Etsy team, the Aspiring Metalsmiths, decided it would be fun for each of us to show where we work to creat all our shiny things for our shops. Well, I call anything a challenge when it comes to organizing a teeny tiny space where I have collected 10 pounds of necessary supplies and tried to store it in an area that should never have more than 2 max!  I don't have a lot of fancy tools, or big professional items like a rolling mill or kiln or even a flex shaft ( that's a big girl tool that lets you change drill bits, polishing wheels and other necessities with ease- it also lets you control the speed at which you use these things). Nope, I have basics- a dremel drill- which has only 4 speeds with just a switch, a small torch, no big tanks of fuel would fit in my space and lots of hammers and pliers.
So first, the birds eye view of where I start creating my rings, bangles and necklaces.

You will note in the background I have a poster important to all women jewelers, Les Aromes du Vin, the aromas of wine, this is my reminder that if I am productive, I get a nice glass of wine at the end of a successful project! On the right is my dremel, back, some of my pliers, drawers contain hammers, files, and all sorts of scribes, dividers, calipers and even used dental tools for getting in tiny spaces (the dentist is every jewelers friend). Underneath are all my bracelet mandrels and just to the left is the tower of wire!!

Next, we all know I am a complete stone freak - Gollum had nothing on me "precious" - so so would think I have this amazing system for storing my gems and stones, being able to sooth my soul by glancing at all the pretty colors- oops- no space for that. Here's my "system" of storing gems and stones.

Next to the box on the left are 2 huge bags filled with those adorable origami boxes filled with individual stones from Cabbingrough http://www.etsy.com/shop/cabbingrough, who has the most gorgeous rocks! In the black box I have organized, again in bags and tiny bags for each stone type, all my faceted gemstones, to the right in little containers are my small to medium cabochon stones.

Now- on to where I actually put things together. Yup- not here- guess where?? The kitchen of course. I need a sink, I need fireproof counters, I need room!


Yes, my set up is very basic. Torch, soldering pad, tripod and a box full of tweezers, various solders and to the right of all this, near the sink is my pickle pot- small crockpots are great for pickle.

Now that you've seen my space, I hope you will really enjoy knowing where your lovely jewelry actually comes from. It's my home, my workplace and it's where I love to be! At the end of the day, when creating is done, and the wine poured, I grab a book from my shelf, curl up and read about yet another techniques I want to learn to do to make more pretty things. This last few weeks has been devoted to flush settings. They are much harder than I thought.

I sure hope you've enjoyed visiting my space. If you have time, listed below are some of my fellow teammies who have shared their space on their own blogs. Visit them and compare- we are all so different in what we create and how and where we work, it's lots of fun to see the differences and similarities!


Jessica Lopour - http://www.abellablue.com/blog
Jeanne Millman, Golden Water Creations http://www.goldenwatercreations.blogspot.com/
Sylvia Anderson www.SylviaAnderson.blogspot.com
Steph Stargell Designs http://stephstargell.com
Clarity, Scrollwork Designs, www.thesquarepegnation.blogspot.com
Brandy, The Frogs Pond http://thefrogspond.wordpress.com/
All Wired Up Jewelry Designs http://allwiredupjewelrydesigns.blogspot.com/
Esmeralda, SilverBlueberry, http://jewelry-by-silverblueberry.blogspot.com/
Heather, Misty Ridge Designs http://mistyridgedesigns.blogspot.com/
Joy http://joypeckjoy.blogspot.com/
Nancy Creations - http://nancysjewelrydesigns.blogspot.com/
Carole Axium http://www.caroleaxiumdesigns.com/journal/

Stacy/Form and Function  http:formandfunktionaccessories.blogspot.com
Lisa at http://sandytoesjewelry.blogspot.com/

Saturday, November 6, 2010

Private Sale in the Works

Before I start to tell my few but loyal readers all about my upcoming sale event, I have to do a little bragging. My team leader on Aspiring Metalsmiths Etsy, Clarity Collins of Scrollwork Designs http://www.etsy.com/shop/Scrollworkdesigns, toughed it out and submitted 10 items from designer members of our team. Now this was extremely difficult, since there are about 80 or more of us! To pick 10 items she took recommendations and her own personal knowledge of many of the artisans, took into account tine with the team, how much we support the team and all that good stuff. Well, we made it into the Holiday Gift Guide on Handmade Spark! We are all doing the happy dance on our forum. Take a peek and enjoy some of our handpicked items, many of which absolutely belong on your wish list or under your tree: http://www.handmadespark.com/blog/holiday-gift-guide-featuring-the-aspiring-metalsmiths/  - as you can see on my header- we even got a cool  button to use on our blogs!

Now, I'm not the most consistent blogger there is, but I do really good when it comes to running a sale and shipping out the goodies. I only do about 4 of these a year (I do still have a full time job that requires my attention over 40 hours a week!), so I try to make my sales worth it to my customers. This sale is for current customers only and for those who have asked to be added to my e-mail list for these sales. I don't want to spam anyone, so I always ask when someone buys if they'd like to be added, I post on facebook so fans can be added, and now I'll comment here- if you want some really good savings- head over to my Etsy shop, go to contact, and send me your e-mail so you can get the sales details! Just to be safe, here's the link to my shop: http://www.etsy.com/shop/PPennee, just look under my Shop owner section and hit contact, simple as that.

Just for a teaser- I usually give a 5% discount on stackable ring sets of 3 and 10% on 6 or more. Lots of people have big families, so getting mother's rings is a good start, then there's grandmother's rings, your best friend needs some for her kids, or heck your BFF just loves pretty jewelry. For my upcoming sale- sets of 3 or more will get 15% off and free shipping. The only restriction is that sets of 3-5 must contain at least one non-gemstone band, sets of 6 or more will need to have 2 non-gemstone bands- your choice, and I have 3 in stock and am adding more this coming week. The bands really do make the sets look great and they can also be worn alone when you just want something simple- and heck, they're really nice! So 2 regular priced rings that are $39 plus a band for $12 would be $90- your price will be $76.50- around $25/ring.

Teaser number 2: I made a real haul at my local gem show this weekend, I got some awesome 4mm green diopside, Burmese rubies and the most fabulous teal blue toumalines. These will be available for the private sale before they are offered in my shop -  when they're gone, I will remove the listing since I only got these for the sale. I will mark them as reserved, so only my private sale customers know they are available for sale.
Talk about your red and green for the holidays or a "Blue, Blue Christmas", these are really high quality and the sale I got will be passed on to you. Once the "reserve" is off, the price will go up for my regular shop listings.

I hope this little preview of my sale will inspire you to send me a quick e-mail and get your name on my list. Sale starts November 13 and runs for 1 week, after that prices revert to normal. More details to come when you get my Sales Event e-mail.

Wednesday, October 20, 2010

Silver Prices and the Artisan Jewelry Market

Is there anyone out there that isn't feeling the brunt of the precious metals market prices? If you shop at a jewelry store, you've surely seen a huge jump in the price of gold and platinum, if you shop on line the discounts are getting smaller and smaller. For those of us in the hand crafted market, silver has always been our mainstay. Silver was more affordable, lovely to wear, and fairly easy to work with and create with. Over the last 6 months, silver supply costs have risen by almost 30%. Why? No one has been able to explain this to me to my satisfaction. I use 100% recycled silver- does it cost 30% more today to recycle than it did 6 months ago?? Probably no chance that is the case, but suppliers are taking full advantage of raising their costs based on the spot price of silver posted daily.

In hopes of maintaining my small hand crafted business, I decided to do a real cost analysis and find out just what it costs me to make for example, a sterling stack ring. Now, not all gemstones are created equally as we all know. A fine quality aquamarine or Brazilian amethyst costs lots more than a heat treated topaz to make a sky blue topaz stone. However, even some of the treated stones can get up there in cost. So I went through all my receipts for stones and silver, plugged them into a spreadsheet that looks at all my fixed (rent, electric, tools) and variable costs (silver, stones, mailers, accountant) and it calculates my cost for each item. To my surprise, I was right on in my "estimated costs" for lots of my artisan crafted products. To my chagrin, I was overpriced on quite a few of my rings. So, good shop owner that I am, http://www.etsy.com/shop/PPennee, I lowered quite a few of my prices by 10% or more on lots of my gemstone rings.
http://www.etsy.com/listing/54357922/sky-blue-topaz-sterling-stacking-ring

Now, I hope this makes lots of my customers really happy. Since I offer discounts on multiple ring purchases, this should make most everyone who has hesitated, reconsider a purchase that isn't for a special gift, but just something they'd love to have. On the other hand, will I be able to continue making these little pretties at this price if the cost of silver continues to skyrocket? I guess only time will tell, but let's hope we as artists can continue to provide our wonderful customers with the best possible quality at a fair and affordable price.

I have read several other blogs on this same subject, so I won't beat a dead horse. Many artists are rasing prices prior to the holidays because they're afraid they won't be able to afford to replace their stock of silver when holiday demands deplete their current inventory. What I am hoping is that I will break even, maybe even make a small profit and that these ridiculously high prices will eventually come down. Keep your fingers crossed for me and for those who have purchased from me or other artisans in the past, thank you for supporting the small businesses that try so very hard to offer you something special.

Wednesday, October 6, 2010

A Reminder That My Shop is Going Green

I made an announcement on Facebook a few weeks ago and got several thumbs up that my handmade jewelry is now made of 100% recyclable silver and all my gemstones from reputable jewelery suppliers that have verified that none of their gems come from those horrid places where people are worked hard, in terrible conditions for no money and at risk of their lives. In other words, conflict free gemstones.

See this blog from my fellow Etsy metalsmith who wrote a paper for her college course on gemstone mining if you'd like more information.  http://thesquarepegnation.blogspot.com/2010/09/what-social-entrepreneurship-means-to.html

I thought I would clarify a few points just so everyone who purchases from me understands what this means to me and to them as buyers.

Well, it is important to me to make sure that I am not creating beautiful things at a cost to the environment. I have made changes in my purchasing and in my daily routine to keep All Wired Up Jewelry Designs as "green" as possible. This is a lot of hard work and research, I'm probably not all the way there yet, but it is my goal to be 100% by year end.

First and foremost, all my creations are made with reclaimed &recycled metals. Unfortunately the world of jewellery is full of "dirty" and non-earth conscious practices, and mining for new metals is one of them. Not only does metal mining produce huge amounts of environmental waste, but it leads to contaminated waterways and our precious earth. By using recycled and reclaimed metals, AWUJD is doing our part to keep the beauty of hand crafted jewelry, without the price to the environment.

In addition, I purchase my gemstones from ethical and reputable sources. I work directly with small stone businesses and family owned mines. I have developed a great relationship with these small business so that I get great stones at fair prices and know I am supporting U.S. business done without child labor, poor working conditions or stones obtained in any illegal manner.

My next step is to use up all my current packaging and go to 100% recycled for sending your lovely treasures!

So now you know that when you see this bracelet in my shop, it was from a reputable U.S. family owned business.


And when you see my cute gemstone sterling stacking rings in my shop, they were make with 100% recycled metal and fro conflict free gemstones! http://www.etsy.com/shop/PPennee?section_id=6791576

So, wear your AWUJD  jewelry  knowing that each pieces boasts the support of small business, comes from environmentally friendly materials and is entirely hand crafted by an artisan that is working hard to make both beautiful jewelry and a better environment.

Sunday, October 3, 2010

I'm Part of an Awesome Team on Etsy

This is Sunday, and I promised myself I would blog at least several times a week. I also promised in my last blog to start highlighting some of my favorite artists. Today I'll start with a small group and at least once a month, with their permission, I'll give you some details about members of my awesome Aspiring Metals Team on Etsy.

As a group, we decided we wanted to get recognition as a team on Handmade Spark. Handmade Spark features lots of different crafts and artists, so the rule was, the team leader had to pick 10 photos of work that represents their team. No problem you say, lots of pretty shiny baubles to choose from. There are 200 members on our team!!! And they want 10 photos. I wouldn't have wanted to be Clarity of Scrollwork Designs this month for anything. You can see Clarity's work in her shop on Etsy at http://www.etsy.com/shop/Scrollworkdesigns .

 Well, she finally came up with 10- we blogged about it on our team blog, talked about on e-mail and here is a link to the Treasury Clarity created to show 10 great pieces of work out of 200 members :
 http://www.etsy.com/treasury/4ca65fe474868eef72440abd/awesome-aspiring-metalsmiths#4ca66206868d6d91019b664f


We were all grateful she had to do the work and happy for those whose work represented the team. I was honored to be included with my sterling hammered cuff bracelet. I've been on the team since January 2009 when it began. Just so you know, the whole team is planning  a sale in January to celebrate our anniversary! Guess it will be a January white sale, you know, for those who got money for Christmas and not any of the really good presents they hinted for. This will be your big chance to score some great one of a kind jewelry at a great discount.

Not to be outdone, I am seriously considering sponsoring a give-away here on my blog to celebrate being back and in hopes of gaining a few more readers. With more readers, I'll be more inspired to do some actual posts on jewelry making techniques, jewelers tricks and best buys for those who want to start making their own shiny adornments.

Have a lovely Sunday and come back again next week. Next post will be my first on jewelry making start up needs and must haves.

Thursday, September 30, 2010

Back To Blogging with Rings Galore

Wow, it's been a very long time since I've blogged. I'll make it short and sweet- my explanation is my daughter got married! Weddings are such a lot of work, I just had to stop doing something, so the blog took the hit
I am happy to be back to blogging and even happier to be back to the bench. I have started adding lots of new hand crafted items to my Etsy shop, http://www.etsy.com/shop/PPennee, rings, bangles, earrings, just lots of fun everyday wear for the modern woman I design for! Busy women can't be bogged down with lots of big career wear decisions every day, nor can busy moms who have to take kids to school and activities and still have time to do their own things. So my goal for the fall and winter was to make things that would meet those needs, go with lots of fall color wardrobe choices and look great if the day turned into an evening out with friends or a dinner date with your husbnd. Here are just a few of my newest listings. Click my shop link for detailed descriptions and prices. Feel free to contact me with any questions!


From top to bottom- Biggs jasper ring with hand stamped pattern band, fine silver foxtail pattern chain, Crazy Lace agate ring with hand stamped pattern bandd, full bead heavy wire bangle, matching 1 1/4 inch post hoop earrings and 2 fabulous fire agate rings. Lots of choices and great colors, patterns and textures for fall and winter.

I am very excited to be back blogging and along with showing off some of my new items, I will also be highlighting some of my favorite artists, new blogs I love and doing some mini tutorials on making basic rings and earrings with just a few basic tools.

Monday, August 23, 2010

CZ Stacking Ring Give Away

I know I have been really delinquent in blogging lately but the daughter's wedding planning is as done as it can get, so I will try to be much better at keeping up at least weekly.

The good news for this week is I have been running an ad on a lovely blog called Bright Bold and Beautiful which has wonderful decorating ideas, gorgeous artwork and lots of fun give-aways by sponsors. Well this week I am a sponsor. I will be giving away one of my terrific looking white 5mm CZ stack rings. These rings are made to be sturdy enough to wear alone with a solid sterling band that will take lots of wear and tear, but look great stacked together with other lovely colored stones or even just some of the fun beaded bands or textured plain bands. I have a huge selection of gemstone rings but do take time to take a look at the blog and enter to win. Find it here http://www.brightboldbeautiful.blogspot.com/ from 8/23 through 8/29.

I have also added some new bezel set stones like a terrific looking ocean jasper and a fossilized coral pendant and some new style sterling cuff bracelets. I hope you will stop by and see some of my new items.

Monday, May 24, 2010

Rings and Things Part 3- Putting It All Together

Rings and Things - Part 3 - Putting it All Together


This is the final installment for rings and things, but certainly not all there is to making rings. I hope with this last blog you will have found a new appreciation for what goes into the whole process of ring making. So much thought and small details make all the difference. For those who are truly interested in making rings, I would recommend purchasing "Creative Stonesetting" by Cogswell who really goes into every minute deatil of ring creation and all the fine finishing that can really make the difference in the beauty of the final product.


Choose metal for your band. Lets keep it simple here and use 18 gauge sheet. Using a ring sizing chart- available at www.contenti.com, pick your ring size and use a straigt edge T square use a sharpie to mark off the length and width you want for the band. Use the appropriate saw blade to saw out this length. Remember, the wider the band, the bigger it needs to be to fit- usually you have to go up about a half size. Use a file to smooth any burs or rough edges and make sure it is perfectly flat and squared up. Now take this band and lay it over your ring mandrel a size or so up from where you want it to finish. This is done because metal is very springy and you need to get the curve started and allow for the metal to be forged slowly into shape. Use a rawhide hammer to start tapping it around the mandrel to shape into a circle. (There are lots of other mandrel shapes, because lets face it, fingers aren't really round, but for lack of a book chapter this will give you the idea). Rawhide should not leave marks and also not spread the metal wider or longer as much as a metal hammer. After the metal is rounded, use fingers or plastic coated pliers to bring the ends past each other back and forth until the two ends meet and touch perfectly flat. If they don't, file and adjust, this will be where you solder the ring together and it must be perfect. Check again for size. Now, use those plastic pliers to flatten the area a bit so your solder will stay put- you can round it on the mandrel again after soldering. I won't go through the soldering process again, but I use hard solder again. After soldering and pickling, clean with a brass brush and file and or sand until there is absolutely no sign of the seam where you soldered inside or out. Leave the area flattered a little where the seam is, this is where you will solder on your bezel. After you attach the bezel you can put the ring on your mandreal and round it out before setting the stone and polishing. Also, if the ring size is a bit off, you can forge with a metal hammer to enlarge and stretch it a bit. Important- you must forge slowly and take the ring off and turn it around in between hammering or one side will get bigger than the other- you want it round on both sides.


Prepare your bezel and band with flux. Everyone does this last part a little different, but I lay my bezel face down on a soldering pad, then place the band on top to see if it will stand by itself. No matter what shape your bezel is, you want to be sure the band is centered font back and also looking down from the top. If this is a large bezel you can use a sharpie to make marks on the bezel back to see where the band goes again after you remove to add solder. Now, remove the band, warm bothe the band and the bezel to dry the flux to a glassy stage. Add easy solder- not too much- you don't want to have to do a lot of sanding and filing excess solder on your nice band and bezel. Place the warmed band back on the bezel. I use my third hand tweezers at this point. I loosen the wing nuts so the tweezers are just a little floppy and lay the tip on the band to hold it still. Remember, solder melts when the metal is hot and you don't want the band to move when the solder flows and have it end up all cockeyed. Since the bezel is much lighter weight than the band and solder flows toward the heat, I start with the torch on the band on either side of the bezel. Keeping the torch moving, get down as close as possible and safe (did I tell you to wear protective eye wear any time you are working with metal or a torch? If not, my bad, never work without glasses or goggles). After the solder flows, take the torch away immediately and allow the ring to cool before quenching and pickling. Clean up is the same as for all the other steps.


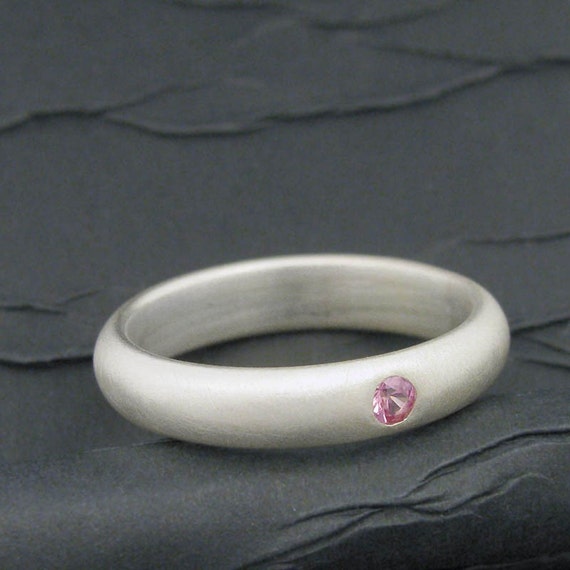
Now you are ready to put the stone in the bezel setting!!! Put your ring in a ring clamp and screw it in snug. I brace mt ring clamp in a bench pin sawed out in the shape of the clamp. Now we have new tools to get out. I use tweezers to pick up my stone and center it over the bezel. Remember, this should fit perfectly so it's not going to just drop in there- if it does, the bezel is too big and the stone will make a little noise as it moves around inside after you have set it.

Use your thumb or sometimes I use a pencil eraser to push the stone down into the setting. Many times you will even hear a little click as it sets itself in place. Check all around to make sure the stone is level and seated properly, if not, push gently buy firmly on the uneven area until seated. Next step, get out a bezel pusher, this tool has a square piece of metal with a flat face set in a round wooden handle. The face is smooth and will be used to push the bezel into the sides of the stone to hold it firmly in place. With an oval for example, pretending it's a clock face, start at 12 o'clock and push, then go to 6 o'clock, then 3 and 9. After this keep going around until all the areas have been pushed tight against the stone. Remember, the bezel should fit perfectly so you don't have much of anything to go up over the top of the stone to hide it. If you have any marks from the pusher in your bezel or any small areas that wrinkled, now get out the bezel burnisher. This is a curved highly polished almost knife used to smooth out those wrinkles and at the same time polish the bezel- to see what one loks like click on this link:

http://www.riogrande.com/MemberArea/ProductPage.aspx?assetname=113017&page=GRID&free_text
1271677891290=burnisher


You can us a little soapy water, a thin coating of oil or even saliva to assure it burnisher moves smoothly around the bezel- keep the tip up and away from the ring so you don't gouge the bezel. Go around until everything is smooth on the sides and when looking down at the top of the ring you don't see a single gap anywhere. This may sound very simple, but I have spend lots of time getting this to look perfect. Bezels can have plain, serrated or scalloped tops which all bring their own challenges. If the top of the bezel is plain, I also use a bezel smoother which looks like the pusher except it have a tiny notch in it the you can scoot all around the very top of the bezel to take out any additional marks and make it very shiny.


Last step- polish! This could and is a whole book chapter, but suffice it to say, the less scratches and marks you leave while fabicating, the less work you have now. Any scratches have to be sanded out with decreasing grit paper, I usually start with 320 and work down 400, 600, 800 I have even gone down to 8000 to get a mirror shine. I wrap the sandpaper in a round mandrel to get the inside and have used all sorts of gadgets to go around the top. When all scratches are removed I use 3M radial discs in my Dremel drill to pre polish then finish with ones that contain polishing rouge. Remember this is all done while the ring is in the ring clamp so you have to keep loosening and moving it to get all the little tiny crevices.


You should now have a beautiful ring to put on your finger and display for all to admire.

Now when you look at the gorgeous hand crafted rings for sale you hopefully have an appreciation of what went into creating that little tiny shiny.


I hope you will also have gained enough knowledge to be discerning when choosing a ring for purchase. There is nothing worse than buying something and when you receive it, it just doesn't measure up to the price you paid. Look for sellers that take pictures from different angles to show all sides of the ring and include the stone and bezel (including from the top), Do zoom in if it's available, the camera doesn't lie. Many of use who make jewelry take digital macro pix of our items and check them out for flaws not visible even with magnifying glasses before we call the item finished and ready for sale. If there is something you can't see don't hesitate to contact the seller and ask for an extra picture- we all have them, but don't necessarily put them up for viewing if they aren't our best.


I hope you've enjoyed this series of blogs. If you like, please leave comments and let me know what else you may find interesting as a topic in jewelry making. I'm sure not an expert by any means, but sometimes I think the experts forget what it's like to be a beginner and they leave out all those little steps and processes that they now do automatically.

Saturday, April 17, 2010

Rings and Things- Part 2 - Fabrication

Wow- I can't believe I promised a second installment and it took this long to get around to it. Planning to go on vacation for 2 weeks out of the country, granddaughter's third birthday party and the full time job really take up way more time than I ever think they will.

Chrysoprase Ring
http://www.artfire.com/modules.php?name=Shop&op=listing&product_id=1224009

Now- let's talk about making the ring. We got through making the bezel for the stone and soldered it together and cleaned it up a little. Now we have to put in on a backplate so the stone has something to sit on. We are talking basic here, no fancy drilled tube settings, step bezels with the back open or prong settings which are totally separate blogs!
First, check to see if the bezel still fits around the stone. The bezel wil not be a perfect round shape (or whatever shape the stone is) after you've moved the two cut ends all around to get them to stay together to solder. If round, I usually use a small mandrel- like a jump ring mandrel, to round out the bezel a little and then fit it over the stone. If it's too small (and too small is always better than too big) I tap it a little with a hammer to stretch the bezel a little. Remember, every time you touch hammer to metal it moves, tap lightly, check size often. If it gets too big you have to start over from scratch!


Choose a piece of sheet silver that will be sturdy enough to solder on your bezel, but not over heavy and thick unless you have a huge stone. I tend to like 24 gauge. Place the bezel on the sheet and mark off around the bezel leaving enought space in case the bezel moves during the soldering process. Another thought at this step is do you want to eventually cut away all the excess silver after soldering the bezel, or do you want some extra to possibly decorate with a pattern wire or maybe even a stamped design. For this ring- I am going to go with solder it on, and cut away the excess. Use good metal shears to cut out your sheet, then flatten with a rawhide mallet. You can't solder anything unless it is touching perfectly flush. Set the bezel on top of the sheet and use a good file to take off any rough edges or uneven spots so it sits perfectly flat. Next step is to get out the solder pad or mesh on top of a tripod, the torch, flux, and now medium solder. Unless your very good at soldering, work with the solder that melts before the one you used to solder the bezel. Flux everything really well and let it dry a little or use the torch to dry any water in the flux. I usually air dry, and cut my solder into small pieces while it's drying. Using fine tweezers, place the solder chips inside the bezel as close to the inside edge as possible, try to space them evenly remembering as you heat the backplate, solder flows toward the heat and you don't want any gaps or holes when you're done- resoldering to fill a hole is a real pain. Light the torch and gently heat the backplate until the flux turns a bit dry- you may have to use a solder pick to carefully keep your little solder chips from moving away from where you put them. At this stage you are now ready to solder if all the chips are still in place- if not try to get them close to the edge again. At this point, I will usually get out my "third hand" gadget and lay the tweezers on top of the bexel to try to keep it in place when the solder melts. Sometimes, just the flow of solder cause the very ligh weight bezel to flow right along with the solder and off the backplate- no that's a real problem! Also the tweezers act like a heat sink and tend to absorb any heat that might get on the thin bezel wire and cause it to melt! Now, the torch can be turned up a bit, continue heating the backplate and not the bezel, remember, it is fine silver and will melt if it gets too hot. Solder melts because the metal is hot, you don't need to touch it with the torch. Keep the torch moving all around the bezel without touching it. When the flux gets clear and glassy looking the solder is about to flow. As soon as you see the solder start to melt, move the torch around the bezel and you will see it fill in under the bezel and make a nice seam. As soon as it does that- remove the heat. Let this newly fabricated piece cool a little, if you quench it in water too soon you can cause metal to fracture. Not a fracture you'll always see, but may find later as you continue the ring making process. Quench in water, then use your copper tongs and put this in an acid pickle bath to remove any flux and firescale in case a spot got too hot. Remove from pickle with copper tongs, rinse with water and use a brass brush to clean up every bit of residue you see. Any leftover residue can cause the ring to tarnish later.


Next step is to get this top piece ready to be soldered onto a ring band (that will be Part 3). Take your trusty metal shears and cut off the excess silver as close to the solder seam as possible without cutting into it. Now you need really good files. I use Swiss files and an American flat file. I start with the American flat file and get off as much of the excess silver as possible, then switch to a #0 Swiss file going around and around until it looks very smooth. I finish up with a #2 Swiss file to finish- when I look down at the bezel I should not see any rough edges or little excess piece of silver sticking out. By now you should have a very nice piece to put your stone in when it's been soldered to the band.


But first, check again to make sure the stone fits inside the bezel on the backplate. If you have extra solder inside that you missed in cleanup, it may be too tight. If you see any excess solder, sand or file it out. In a tiny space you may have to get creative as to what you use to wrap sandpaper around to get into those little tiny bezels. Asumming it is clean, I use a piece of dental floss over the bezel and put my stone in on top of the floss. You have to be able to get the stone out again since almost no stone can tolerate the heat it will take to solder the bezel to the band. Another consideration after you have determined the fit is still good- do you open up the back of the bezel or leave it solid? If you open it up then when you clean the ring any liquid that gets inside between the stone and bezel can get out the back. If the ring needs repaired, you can get the stone out and work on the ring without damage to the stone. If it's a clear stone, even though 90% of light enters through the top of the stone, opening the back sometimes allows even more light through to show the beauty of the stone. Leaving it solid makes it a bit sturdier if it's a smaller stone, but does allow for accumulation of any dust and dirt or liquids that may cause tarnish- how many of us take rings off every time we wash our hands? I vote to open the back.


Draw a circle or design inside the bezel with a sharpie allowing a small amount of the backplate as a shelf for the stone to sit on. Using a metal center punch, find a spot just inside the sharipe line and tap a small starter dent in the silver bckplate. Take a small drill bit and attach it to you dremel or flexshaft and drill a tiny hole where that dent is. Now thread a small #4 saw blade throught that hole. One end of the blade should already be attached to the saw frame before you thread it through the hole, then attach the blade to the other end of the saw frame and tighten it down. Then adjust the top for length until you hear a nice ping sound in the blade. Go ahead and saw out the circle you drew being careful to stay inside your line. Always better to saw out too little than too much, you can always use small needle files to get more out later. When you have finished sawing, undo one end of the blade to get the saw blade out of the little piece you have. Get out the needle files and smooth out the circle and rough edges until everything is smooth and even and shiny. Now is also a good time to file away any seam left on the bezel from soldering it together. The seam should never show around the stone, but I don't like to file that too soon since before it is on the backplate I could make the metal too thin or stretch it out and then the bezel could melt, or just not fit. When filing the bezel, be very careful not to push and pull the upright part, the bezel should stay vertical at all times otherwise it could wrinkle when trying to close it over the stone.


Next blog, we make the band, solder the bezel to the band and set the stone. Bet you never knew there was this much to do just so you could wear that great looking ring you found shopping for hand crafted jewelry.

Monday, April 12, 2010

Rings and Things - Part 1- The Design

I have to get better about tending to my blog. It's really fun, but I just never seem to know what to say when I sit down to write and all the things I wanted to say just seem to have flown out of my head when I do sit down. Today I decided I will definitely post and do better for the rest of this year!

Being an aspiring metalsmith, it took me a while to get to the point I would attempt a ring. They are so darn small! They are so complicated. I wanted to share the process just so ring lovers everywhere would know how much goes into creating these little beauties.

Rings- geesh, every woman I know has at least one, some have a collection that would compete against the crown jewels. Me, I love rings, I like all the varied shapes, designs, colored stones and even just designs in metal. I haven't gotten to the point of wearing them on multiple fingers, but I do wear one or more (stacked of course) on each hand. So, a little blog about something as simple as a ring- more about the process of creating this small but eye catching little piece of jewelry that can have meaning of friendship, marriage or just says we love to have fun. I hope those who love and purchase rings will appreciate just how much goes into the process before you put that little ring on your finger!

First comes the idea- The Design as it were- do you want a simple band or fancy, a stone - large or small, faceted or not, gem or natural cabachon, all metal- gold, silver copper or mixed metals. Do you see where I'm going with this? Creating a ring is no different than any other piece of jewelry- so many choices. Now comes the hard part- is this ring going to be a unique one of a kind piece or is it going to be something you want to offer your customers on an ongoing basis so they can have more than one, different colors or give as a gift to a friend that admired theirs. I love the whole idea of stacking rings, you can change your selections to match your outfits, have plain metals mixed in and wear as many as you want. I have started making a bunch of them and can't wait to offer them to my customers. Stacking rings are just so much fun! How can you not love these?

http://www.flickr.com/photos/allwiredupjewelrydesigns/4448341035/

These have to be customized to anyone who orders them, you can't just make one size, so that involves having a lot of stock on hand- silver, gemstones bezel cups or bezel wire and silver sheet and all those grand mealsmith materials like torch, solder, hammers, bezel pusher, burnish- oh, the list goes on and on.

Now, back to the making of the ring. Assuming you only want to do one- or you have only one terrific stone nd you want to show it off- what next? First, you have to measure the stone or know it's calibrated size if it's a standard shape. For a non- standard shape, measuring the outside and then the height is of the utmost importance. Next you find the bezel wire you want- plain, serrated, scalloped, gallery wire- and it has to be just the right height to hold the ring in place without covering it up too much. Now the fun part, you measure around the ring again with the bezel wire and cut- the old adage measure twice, cut once- is really important here, otherwise you have a lot of wasted silver bezel wire laying about. Now you carefully solder that together and clean it up so no seam is visible, check that it still fits around your stone. Not fitting is another blog entry!

Now, find a piece of silver sheet for the back of the ring. You have to solder the finished bezel to that. Cutting a piece larger than your shaped bezel is important because the little devil bezel might move when you solder the bezel to the silver sheet. Another question- are you going to make the back larger than the stone and add embellishments or are you going to cut and file it off so it's a perfect fit with no material showing? Are you going to leave the back solid or will you saw out a piece of the back to let a little light shine through the stone- see this is harder than you thought! Remeber, you have to use a different solder than you did on the bezel when you attach it, otherwise the first solder join will melt apart. Solder comes in hard, medium and easy and each melts at a different temperature. Hardtakes the most heat, easy the least. I always start with hard and work my way down to easy if I am only doing a basic ring. Again, another blog post if your doing something complicated where you need to protect a second stones set next to a bigger one or adding a wire design or other embellishments.


I will stop here so you can just think about the design process. Keep in mind, we haven't even made the band yet or checked to see if the stone will still fit into the bezel soldered on to the backplate. Heck- I haven't even gone through soldering on the backplate yet! If it doesn't fit, you have to usually start all over.
Next time you are browsing through the rings category- just look at the top- the part everyone sees and know that lots of work went into just that part that you want everyone to admire when you wear the ring.
I promise to blog again tomorrow with Part 2 - Making the band and sizing. Part 3 will be all about setting the stone and finishing to make it pretty and shiny!

I hope you've enjoyed this first entry and come back to read more.
Have a wonderful day everyone.


Posted in General by ppennee on April 12, 2010 at 3:47am
Previous
Comments (0)


Products From ppennee's Studio


stamped silve...

ppennee US $42.50

spin ring-mad...

ppennee US $45.00

smokey topaz ...

ppennee US $40.00

chrysoprase s...

ppennee US $35.00

labradorite a...

ppennee US $40.00

silver bangle...

ppennee US $40.00 Comments

Add comment

Text (Required)


BLOG CATEGORIES

General


New Reduced Price Items


Holiday Specials


RECENTLY POSTED

Rings and Things - Part 1, Design


The Step Bezel Nightmare


March Madness Sale


Back from a Facebook Virus


Work in Progress, Sawing

Sunday, March 21, 2010

Spring is Sprung - Aspiring Metalsmith's Team Challenge

I just had to write a little piece on the aspiring metalsmiths spring challenge before the final voting is done tonight. Our groups first challenge was rings. I had never made a ring before, but stepped up to the plate and turned one out. Needless to say, I barely got an honorable mention with my quite amateuish entry, but I learned a lot. Winner of the challenge got to pick the next challenge. She throws out the age old ditty-" Spring is sprung, the grass is riz" and says to us, we will vote based on best interpretation AND thinking out of the "boxness". You gotta love anyone who can make up a word like that and keep a straight face. You can check out the entries here at http://aspiringmetalsmiths.blogspot.com/. You will notice if you look at all the entries, one in particular- the current leader and most likely winner- is totally out of the box. An egg, in the fashion of the great Fabrege with a totally cool scene inside complete with sky inside the top, grass in the bottom and a bow on top. This baby is outrageous! I must say, I now realize I don't think out of the box at all when it comes to metalsmithing- at least not yet. But Asa, from asap designs, http://www.etsy.com/shop/asapdesigns, certainly got out of the box and showed us all what's possible.

I guess I should show my entry, which I originally thought was a little out of the box. I really had never seen a stack of bracelets with flowers and birds so I was quite pleased with my efforts. I even got a few votes.


I have been enthralled with some other metalsmiths gorgeous flowers, so I sawed out my own, put a little created ruby in one, made little silver and copper balls I soldered to the inside of others and then made a tiny little birdie. These were soldered to my twig bangles. As an extra, I added a separate twig bangle with balled ends to simulate budding branches. I had a great time doing this set and even surprised myself  a little in the process. I am learning so many new things!

So, the winner of this challenge gets to pick the next one. I think everyone wants a little more time to finish the next project since many of our members just couldn't get one done in time for an entry. I am looking forward to seeing with Asa comes up with, since she is definitely our  most "out of the boxness" member! 

I also want to mention AWE shop, found at http://www.etsy.com/shop/AWEshop, who came up with the coolest copper tree and bird lariat I could ever imagine- she did this on short notice since she hadn't planned on entering because of other commitments! Said she was working on a project, this came to her, she stopped what she was doing and made this great necklace! Check it out on the metalsmiths blog, I want to have this kind of inspiration come to me while doing anything!

 Depending on the deadline, I may or may not be able to participate. I am off to Spain for a much needed 2 week vacation. Spain had been on my to do list forever- DH was not supportive of this trip, he wanted to go to Scotland. My response was, we went on 2 other trips he wanted to do, this one was my choice. See, I really do know how to stand my ground. Of course, if he wouldn't go to Spain, I would have caved in and gone to Scotland. My reasoning with him was simple, they don't grow grapes in Scotland so I can't drink wine! I would have to drink Scotch all the time and would be asleep half the trip because that stuff kicks my butt!

Thursday, March 11, 2010

The Step Bezel Nightmare


I realize this isn't a picture that says much to the average person who likes jewelry, it's just a blue stone in a silver casing with a ring on top so you can put a chain through it and hang it around your neck. To someone who has journeyed along the path of an aspiring metalsmiths, they can see all the pain I went through to get just this far and will know I am still struggling because it fought me every step of the way. They say it's always the journey that's most important. So here's a little story about my journey to get to this point.


 First, the blue stone was a gorgeous London blue topaz briolette that I had wire wrapped as a pendant. While trying to repair a small mistake in the wire wrapping I broke the tip of the stone where the wire goes through and holds it together. That was a really expensive slip of the pliers! So, I call on my trusty group of friends on the aspiring metalsmiths thread and get some advice. Make a step bezel says Clarity, you can do it, here's how. So I follow directions and find that, even following directions, metal has a mind of it's own. The little square wire I soldered onto the bottom of the bezel wire, made it almost impossible to move it into shape around my lovely stone. I had to do this in order to solder it together so the stone would stay in there and not fall out the back. The little square wire is the "step" it sits on. After much pushing, pulling, yelling and throwing a few obscenities, I did get it soldered closed and guess what- the stone fit. But, yes, there is always a but in metalsmithing , the bottom of the stone was fatter than the top, so it was laying belly up, tip down. The extra wire at the top is supposed to lay smoothly along the stone folded over with no" ruffles" to just hold it from falling out the front. Well that's all very nice in theory, but no one told me that after all that pushing and pulling that my little tool called a "bezel pusher" was going to need the strength of a sumo wrestler behind it to push what is now called "work hardened" metal over that stone. Along comes more advice from my friend Clarity (you must see her work at http://www.scrollworkdesigns.etsy.com/  ) she really does know what she's talking about, but she has a horseshoe somewhere to get all the work cranked out every week that she does! Clarity tells me, put the stone in something that's hard but with a dip in it so the stone will sit down in it while tapping with your hammer to get out all those nasty ruffles. You can see those in the picture above.  Well, that little piece at the top of the page is small- smaller than a breadbox for sure, and smaller than every bottlecap and twist top I could find in my house. So, I finally found a teeny tiny cap and hammered away. I also have a little tool that I call a bezel smoother- it has a notch in the bottom that you scoot around the bezel- again trying to remove ruffles. (I actually used to like ruffles- on clothes anyhow).

I must digress a bit, because another step I took- without asking first- was to solder on the top of this project- the bail used to hang the pendant. This soldering not only got in the way of the hammering I was trying to do, but also hardened up the metal around the stone even more! Enter the second sumo wrestler to assist the first one! My thought was, I couldn't solder anything to the top after the stone was in there, the torch would fry my lovely blue topaz. As you can see from the second picture, the twist I put in the top made the part I soldered way to close to the front- no way to get a tiny hammer in that space.

Well, Clarity and I chatted again and she says, you can do this, try again, smooth it out, hammer it some more and file the back of that thing so it looks like you really tried. I won't bore you with the details of the third session, but the picture at the top is the final result I obtained without shattering the stone or melting the whole thing down and starting over. I learned a ton of information, hopefully I can retain it, and make a lot fewer mistakes the next time.

I see a lot of beautiful, professional looking work on Etsy and Artfire and many other sites. I wish the customers that shopped at these sites had even a tiny idea of what it takes to get to a place where you feel you have something really worth taking a picture of, writing a description for and offering up to the world to see and buy, handmade by you, with love and an awful lot of melted metal and crumbled stones before you have finally arrived at the point of offering your work for sale.

Wednesday, March 3, 2010

March Madness Sale

Getting around to having a sale is a lot tougher than it sounds- department stores have them all the time! Stores have tons of items that they put on sale every week to attract buyers, lost leaders, they call them. They get you in there with the promise of something really inexpensive, it's not exactly what you want, but the price is sooo good you buy it anyhow or, if you don't they figure you'll buy something else while you're in there.
Doing this in an on line handmade shop is a lot different. As an artisan, I have a lot fewer items to sell. I have already tried to price my items fairly and competitively with other artisans. But since everyone loves getting a bargin or just can't afford your regular price, I have decided to have a sale!
Rather than offer a small percentage off all my items, I have decided to offer a few items each week in March at a really good discount 15-20% off. Now to me, that's a sale. 
My first item for sale the first week of March Madness is my 24k gold vermeil diamond moon pendant and labradorite marquire briolette necklace. This necklace is all hand wire wrapped in 14k gold fill with a great gold fill chain and lobster claw clasp and it does have a 1 point diamond! .http://www.etsy.com/view_listing.php?listing_id=30391235. There are also matching earrings I will be putting on sale later this week.
I would also like to introduce some of my new heart charm bangles, these seem to be very popular, my cut out heart bangle is one of my best sellers. Stamped jewelry is also very poplular this year, allowing people to express themselves a bit. So I have added a poetry heart bangle http://www.etsy.com/view_listing.php?listing_id=41659929 and two puffed heart bangles, one hammered and one smooth to my collection.

On a personal note, my daughter's wedding plans are moving right along. We have "the dress". A fun experience with her trying on everything her bridesmaids and I picked out, modeling and getting pix- the best were her with her knee high socks peeking out from under some gorgeous gowns! Now for the caterer and flowers! Wish me luck.

Thursday, February 25, 2010

March Madness Starting Early

I have been having so much fun learning new metalsmithing skills this month, I decided to start early for a March Madness incentive in my Etsy shop. Starting today I put one item on sale http://www.etsy.com/view_listing.php?listing_id=30391235. I thought it would be fun to put a different item on sale each day of the month that will remain on sale for the entire month. Sale prices will be anywhere from 5-20% off regular prices. I will also be adding some new items every week- since it is March- look for some beautiful aquamarine gemstone jewelry for those March born and also some of my newest bracelets, earrings and rings created with my newly learned skills. As always, my facebook fans and blog followers get 10% off any item in my shop.

My daughter's fall wedding plans are the other all consuming thing in my life lately. Yesterday the 2 flower girl dresses and th ring bearer's suit arrived. Too cute for words. But, why is she buying all this stuff when she's having an officiant do the service at the reception site? Boggles my mind. The photographer has been chosen, boy am I in the wrong business, for 6 hours pay that guy could help with the national debt! The DJ is still up in the air- they each have so much to offer (who knew?). I am in charge of finding the caterer and arranging for flower arrangements- that sounds strange. I get to do food and flowers because they are two things I do really well at home AND my daughter could care less about those things, she is really looking forward to a big party. If I sound a bit jaded it is not because I am not happy for her or unenthusiastic about the upcoming nuptuals. I come from a different era where buying a home and having money in the bank for emergencies (or lack of work) were the top things my parents taught me to always think about. Pay yourself first, they would say- it's important to have momey in the bank, you never know what's going to happen! I'm not tottally a follower of this way of life, but I am a little shocked that there are people that take out a second mortgage on their homes to give their children a "proper wedding". I know I will get through this and have a wonderful time once the big things are done and we can think about what day to have a shower and all the pre-wedding fun stuff. It's just the planning part that's amking me nuts. And it takes time away from what I like to do best- make jewelry!

Sunday, February 14, 2010

My First Ever Bezel Set Ring

Joining up the the Aspiring Metalsmiths Team on Etsy was probably one of the best things I ever did for myself! Not that I don't love wire wrapping beautiful gemstones to create great necklaces, earrings and bracelets, but there is so much more to jewelry than that. Once you learn how to saw, solder, use a torch and forge metal, the world of creativity really opens up.
The best thing about this new team of men and women is they are willing to share not only success but failure and answer any and every question about techniques and tricks learned from other teachers and mentors. The next best thing is they have made me challenge myself. I don't think I would have ever attempted a ring for years to come, just wasn't on my radar screen. But here it is, not perfect, and no great design revelation, but it is complete and doing it gave me grear ideas for many more projects to come. Lord, I can't wait to see what they come up with for their next challenge.

http://farm5.static.flickr.com/4063/4354588083_99351faeb3.jpg

Wednesday, February 10, 2010

Blizzard Jewelry From a Frustrated Metalsmith

It's just snowing like crazy and blowing even harder here at home. So what do I do, I make jewelry- or at least I attemp to. I am a frustrated metalsmith. I really want to be a metalsmith, but there are limited classes I have access to with a full time job (now there's a conundrum- I have to work to even do this hobby). So I go on line, I buy a tutorial to make something and off I go. Well, I actually had some level of success today. I made a spin ring, for those who like to fidget with their jewelry, this ring has an extra ring in the center that spins around.  I also pierced with my trusty saw, 2 lovely trees on copper to make earrings. The trees didn't turn out exactly alike so I just said, hey, no two trees are alike, and I finished them anyhow. Next I bought another tutorial to saw out flowers to make earrings, I decided to make them look like dogwoods even though dogwoods don't come in copper color. So, all in all, I had a productive day.
Check out the ring on flickr and you can see some of my other blizzard projects!
http://www.flickr.com/photos/allwiredupjewelrydesigns/4346371821/

I have to saw I am not looking forward to shoveling out tomorrow- which I must- with the help of my daughter and hopefully her fiance. But I am looking forward to eating my great smelling veal goulash that's been simmering on the stove all day. My friend from Austria even sent me a link from youtube on how to make spaetzle to go with the stew. Can't wait to eat something warm while watching snow blow.

Wednesday, January 27, 2010

Back From A Facebook Virus

Back from a Facebook Virus


I really is sad when a social network is targeted with a virus for all of us trusting souls to "catch". I was one of the unfortunates, who seeing the "your friend X shared a link with you from facebook, opened it (no virus warnings here) and got a virus that sent my computer into a black hole. Be warned fellow FB friends, this virus won't be stopped with standard windows virus protection, you need the big guns- unfortunately those are the ones you have to buy and install. Well, now I have a new computer- loaded with virus protection and am ready to blog gain.


My big news is, I got to take a metal clay art class from Dina Alexander who won the 2008 Saul Bell Design Award in metal clay (see the picture of her winning jewelry in the new Rio 2010 tools catalogue)- at my local community college no less! Come to find out, she is a local Marylander. We had an absolute blast for 2 days, learning to roll, texture, bezel, make slip, fire and polish. I must say I was impressed with what came out of what was advertised in the couse catalogue as a "begginer" class. WOW- some of the work was just gorgeous and Dina was one of those rare souls who found something beautiful in everyone's work and let them know it. She was a real joy to have as an instructor. What an eye opener to see how versitle and flexible metal clay is and to just think about the endless possibilities of what can be done and incorporated into every type of jewelry design. I learned from making lots of mistakes, do-overs were the norm rather than the exception, but I came away feeling really good about what I had learned and how much I want to learn more about this exciting medium.

I have attached a picture of one of the larger links I made to make a necklace in the future, just to give anyone reading this blog an idea of what you can finish in just one class. I made about 12 items with my precious one ounze of clay and can't wait to buy more and take the "advanced" class in the spring.

I haven't added many new items since my computer went down, but I have been creating and will be adding next week after taking photos. I have extended free shipping in the US through Valentine's Day. Also, unadvertised, anyone who purchases from me in January through Valentine's Day gets a 15% discount on any one item in my shop over the next 6 months.


Look for more new items soon!!

Saturday, January 9, 2010

Work in Progress on Sawing and Piercing

My first attemp at piercing-lots more filing to do!
I have spent the week attempting to learn how to saw through metal then actually make something with my new-found skill. I use that term loosly since I now know that sawing through metal has it's own set of challenges I never imagined. I have new respect for carpenters everywhere. The rule of measure twice, cut once is now Platinum in my book. The link to my first piercing above will take you to a picture of a pair of earrings done with a slice of moon and two star cut outs in a pair of 1 inch disk earrings. I also added a little wave to them so they look more like potato chips than big round disks. I'm glad I took this picture, it shows all my mistakes! I was so excited to finish that I just took the pictures and then, low and behold, I saw all the filing I had not done, all the angles that weren't quite right. I have since fixed these, but haven't had the nerve to re-take a picture for fear of seeing even more mistakes I didn't see the first time.
I also made a copper cuff bracelet and thanks to lots of advice from Sonja at Silver River Jewelry (Artfire artisan), I at least managed to get a passable and wearable bracelet. Pix of that next time. So I am now in the process of cutting hearts out of a silver disk to solder on top of a hammered brass disk to make a pendant. Wish me luck  since I am quickly running out of silver disks from all the mistakes and just haven't had the nerve to actually order silver sheet yet.

Tuesday, January 5, 2010

New Year New Skills

I hope everone had a great holiday and a fabulous New Years. I plugged through the holidays eating, drinking and being merry, but mostly- I had a whole week off from my full time job and started working on some new skills for my metalsmithing work.  This is one of my newest! Silver Swirls Cuff Bracelet that I did with very heavy wire. I love it- it just gleams when you wear it!
 I also am learning to saw metal so that I can start piercing designs into my silver. Thank God for Art Jewelry magazine videos and youtube- they have some really great people who tell you what not to do so you don't get into too much trouble before you even start. When most people think about sawing, they think about carpenters and wood- oh no- these are teeny, tiny saw blades that like to snap in half when you do the least little thing wron. Talk about trying your patience! So, I have cut lines, squiggles and hearts and starts. Now I am going to actually try this on a piece of copper sheet and make a bracelet that I may actually wear. I'll keep you posted.
Next skill to learn will be bezel setting so I can put some of my lovely gems into a pretty setting to make a ring or pendant. I am very excited about that.
Just in case you haven't visited my shops lately- Free Shipping is still available in the US through the end of January. Sorry to say, after that I have to go back to charging a nominal fee for first class to cover postage and mailers. Visit soon, I have added quite a few new things over the holidays and you really have to do something with that Christmas money from your loving auntie! Visit me at http://www.ppennee.etsy.com/